Tuesday, January 18, 2011

Chocolate Mousse-Brownie Trifle


This is the first trifle I have ever made. To me, trifles look complicated and I don't like complicated things. I do believe in the 4-H motto though, learn to do by doing, so I thought I would give this a try as it looked so good. Of course my trifle does not look as beautiful as the one in the Woman's Day magazine where I found the recipe, but I like to call my pictures real life shots, from a person who cares more about the taste than the presentation. I do have to say that it was hard to keep my husband and daughter's hands off this until it was served, so it must have looked good to them and that is what matters. By the way, this trifle was easy to make, and I even did some extra steps like make my own brownies. I am definitely making this again - so yummy. I recommend you give this a try. I sort of "halfed" the recipe as we only have three people at our house. It is hard to half three eggs so I did a lot of guesstimating. 
I also like using honey in my whipped cream instead of sugar. You should try it. It is amazing and better for you. This recipe is from the National Honey Board website. You should check it out as they have some good recipes.

Whipped Cream with Honey

Makes 2-1/4 cups
  • 1 cup whipping cream
  • 2 Tablespoons honey
  • 1 teaspoon vanilla
  • Salt
Chill beaters, bowl and cream. Whip cream and dash salt until soft peaks form. Slowly beat in honey and vanilla. Serving Size: 2 Tablespoons
Here is the recipe card....
Thanks for looking!

Saturday, January 15, 2011

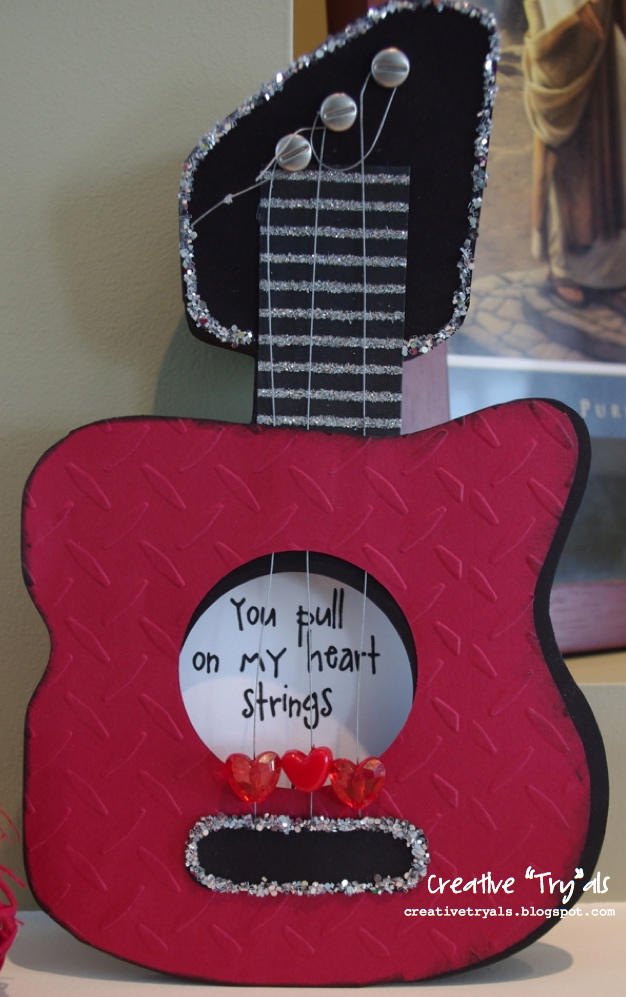
You Pull on my Heart Strings - Valentines Day Card


This card is one of my original designs. I had the idea in my mind for a long time but I couldn't figure out the guitar style for a while. The inside sentiment says "You pull on my hearts strings and play a lovely tune." It is made from a full 8 1/2 x 11 sheet, folded in half. I cut the guitar design out, and another base guitar shape. I added strings with heart beads and glued on the a guitar tab to cover the strings to the base. I glued the base onto the full guitar that had brads attached, and the guitar neck already decorated. I wrapped the strings around the brads and added sparkles around the areas I felt needed some bling to them.
Thanks for looking!

Friday, January 14, 2011

What Cancer Cannot Do - Encouragement Gift Idea


At work we are putting a basket together for a former colleague who has just found out she has kidney cancer. I found this saying when my dad found out he had cancer and this helped me cope with the news. I am hoping this framed poster will help bring strength, courage and hope when it is needed. Here is how I made the poster....


It is kind of hard to see the background on the poster, but if you look closely you can see it. I wanted to use the colors grey, black white and yellow. I did not have any grey paper on hand that I liked so I made my own. I went into my publishing program on my computer. I made a 4x6 grey box. 

Then I added a few dingbats in a lighter grey. The dingbat I used is called Typo Backgrounds. You can download it free by clicking HERE.

Here is how the poster turned out after adding shapes and text. You can download this one or make your own. The borders didn't show up in the frame I purchased, and it doesn't matter because I think it looks better without them.

The Secret Stitch Club is where I found a tutorial how to make the rosettes. I did not glue the rosettes on the frame like it says to do in the tutorial. I glued them on a little cardboard circle first and then I glued them on the frame. This was the first time I made these flowers and I didn't want them glued on the frame just in case they didn't work out. Also, I like being able to move things around to see placement options. Click HERE to go to the tutorial.


My rosettes are made out of different materials, and they are small. The black and white rosette is from an old skirt. The length of the fabric I used was nine inches and 1 1/2 inches wide. The yellow and white rosettes are a material that I have no clue what they are. The white stuff came with my sofa when I purchased it. It reminds me of interfacing or a bounce sheet. I was considering using a used bounce sheet, but I didn't have any that weren't in the garbage. The yellow material also reminds me of interfacing. I bought it at a discount store on a roll. I glued some pearls and jewels in the middle of each rosette. Before I glued them on the frame, I glue a little piece of tulle to the frame.
Thanks for looking!

Wednesday, January 12, 2011

Trust in Your Potential - Inspirational Card


At my Church, we spotlight a woman every Sunday. I volunteered to make an inspirational card to give to all those being spotlighted. I saw a card like this (sorry I don't have the link) and I loved the quote so I had to make some cards with this quote on it. I thought this was a good quote to start off a new year with. Here are the colors I used. I am sure any color would look fabulous.


The plant was cut by a Cricut from the cartridge "Lyrical Letters" page 66, size 3 1/2.
When I sew on a card, I intentionally don't go straight and I backstitch at every corner.
Download and print the card below and give it a try. 


Trust in Your Potential

Monday, January 10, 2011

Quick Rising Home Made Flax Seed Pizza Dough


I got a whole wheat pizza dough recipe from a friend that was very easy to make, it finished rising within twenty minutes - but I did not like how it tasted. I am not a whole wheat pizza crust kind of girl. I do like the idea of something healthy in my pizza dough - so I altered the recipe. I like white pizza crusts, but adding flax to the dough I find enhances the flavor, and the nutrition. Here is the recipe....

Yields two 12 inch pizza crusts

2 1/2  cups All-purpose flour
1/2 cup ground flax
2 tbsp. flax seed
4 1/2 tsp. Quick rising yeast (or two envelopes)
1 tsp. salt
1 1/3 c hot tap water (I warm my water in a kettle)
4 tsp olive oil
4 tsp liquid honey
olive oil for top of dough

In a large bowl, combine flour, flax, seed, yeast and salt mix well.
Measure hot water into a measuring cup, then stir in olive oil and honey to dissolve. Pour mixture over dry ingredients and mix with a wooden spoon to form a ball. Add a bit of flour and knead for two minutes in the bowl to save cleaning the counter.

Ensure all dough bits are gathered up and then grease the dough with olive oil and flip over a couple times to grease the bowl. Cover. Let rise in a warm place until double the size - about 20 minutes.

When dough has risen, turn out onto a lightly floured surface, cut in half and roll each half into a circle or use hands to stretch dough into desired shape. Transfer dough to prepared pizza pans. Top with favorite toppings and bake in oven at 425 degrees F for about 15 minutes, or prick crust in several places with a fork and bake for 6 minutes. Remove crust from oven, top with desired toppings, and bake for an additional 8-10 minutes.

Friday, January 7, 2011

Home Made Dog Lover's Gift Set


I made this "Dog Lover's" gift set for a Christmas present.  I was really excited how this turned out and it was very well received. I bought a notebook, with the breed of dog the recipient has. I bought slippers - it would have been better if they were black and white - but they weren't so I had to settle. I bought some chew bones and a box of dog treats. I bought a t-shirt and put on an iron on transfer with a picture of the recipients dog.


The shirt is really what made the gift. Iron on transfers are easy to work with, unless you forget to reverse the lettering like I did on the first one I printed out- so remember to do that.


I sewed a bag with leftover material from a pair of pajama bottoms I made for my daughter and put everything in it. I guess you can give the gift just like this, but personally, I like receiving a wrapped gift so I did put it in a box and wrap it.

Wednesday, January 5, 2011

Spread Your Wings and Fly Card


I love inspiring and motivating sayings, so it is a given that I love inspiring and motivating cards. I found the inspiration for these cards on Niki Estes blog that you can go to by clicking HERE.
My cards are not as fancy, but I did about six cards in an hour. I love the different colors you can play with.

I cut out the butterfly from the "Give a Hoot" Cricut cartridge on page 76. The size was 1 1/2. I did a white shadow for the orange card, but I liked just the black butterfly on the aqua and blue card. I printed the text out on my computer and drew on the border and the butterfly trail. I added on two jewels. 


Thanks for looking!