Saturday, May 7, 2011

Touching Sentiment for a Mother's Day Card


I am always on the hunt for the perfect sentiment for cards. I am fairly good at being creative with the cards and putting a lot of thought and work into the making of them - but sentiments sometimes seem to be an after thought and then I end up writing something that I don't feel meets the standard of the card. Let's face it - the sentiment is a big part of a card.  Last year around Mother's Day I found this on a card....

  I hope that when people look at me 
they see a little bit of you.

From the moment I read this sentiment - I knew that was going to be the theme of my Mother's Day cards for this year. I am thinking this will be the Father's Day card theme too.
So.... to make this card I started from the inside out. 

I cut two pieces of corrogated cardboard 7"x8". I ripped a bit of the cardboard to show the ripples. 
I printed the sentiment off my computer. 
The frame around the sentiment is a Victorian Floral frame from Graphics Fairy.
Along with the sentiment I put pictures of my mom and I, and my daughter and my mom. 


The front piece of the card, I wrapped in lace that I adhered with hot glue and tacky glue. 
Then I proceeded to decorate the front with rhinestone border stickers and flowers. 

Of course I made one for my mother-in law....


and my Auntie too....


I punched holes in the card stock and attached the two halves together with binder rings. I printed another Victorian floral frame and pasted it on the back so I could sign the card and write "Happy Mother's Day"
Thanks for stopping by. Happy Mother's Day everyone!
Linking up to....
Graphics Fairy

UndertheTableandDreaming

Friday, May 6, 2011

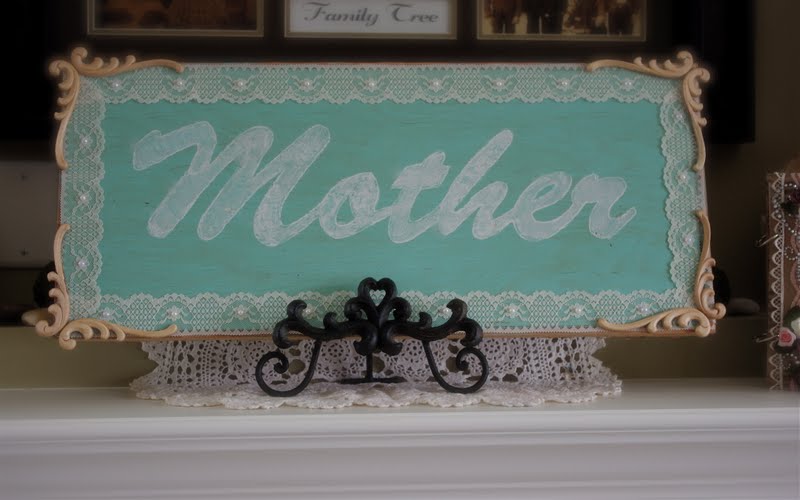
Mother's Day Sign


Remember my "Spring" sign? I made that sign with the intention of switching it up for the seasons. This is what I did for Mother's Day. 

I painted "mother" on using washable white paint. I outlined it in chalk. I taped lace around the edge with double sided craft tape after I removed the corner scrolls, then I hot glued the scrolls back on using the glue sparingly so it will be easy to take off again.


The lace has flowers on it, so I added a sticker pearl to the center of each flower.


This turned out so pretty and feminine looking. I can't wait to show you the item that is to the right of this sign - but I can't show you until tomorrow!


Thanks for stopping by!

Linking up to....


Wednesday, May 4, 2011

Duct Tape and Staple Bag - Gift Bag Idea


I needed a fairly large gift bag for a Mother's Day gift - but I also wanted it to be a bag that could be used as a shopping bag or a beach bag. A couple years ago I made a no sew bag that was a lot of fun. I found it on the Martha Stewart website. A lady made bags with staples and duct tape. So cool!
Here is how I made mine:


I bought a vinyl tablecloth. I cut a piece of vinyl 24 inches wide and 44 inches long. I cut two strips for the handle that were 24 inches long - 3 inches wide. I folded the handle strips in to each other so no raw edges were showing and machine stitched around the edges. The handles were 1 1/4" wide when I was finished. If you want to make this a total no sew project - you can use ribbon, belts, cord, or other materials that already have a finished edge. 


1. Fold the vinyl in half. Fold each top edge over about 2 inches. Measure strap placement - I measured 7 inches from edge. Tape to secure. Then do a big strip of duct tape to finish the whole folded over edge.

2. Draw a line about 1" from both sides. Making sure the top edges are even - put a staple at the top of each side. Continue stapling very close together until you reach the bottom of the bag. Complete both sides.

3. Finish the stapled edges with duct tape - folding the tape over to cover the staples on both sides. You may need to cut the edge so the duct tape will fit - so measure or eyeball it before taping.


4. Once both sides of the bag are stapled and duct taped, put your hand in the bag to flatten out the bottom and make a triangle on the outside of the bag at both sides.

5. Picture 5 show the triangle that should be at the bottom of the bag. Draw a line across the triangle, about three inches in, depending on how wide you want the bottom of your bag to be. Staple across that line. Continue with other side.

6. Turn bag right side out. Picture 6 shows the bottom of the bag. You can duct tape over the staples or you can put a piece of cardboard in the bottom of the bag to make it more firm on the bottom.

I will be able to get another big bag from that table cloth and a smaller bag as well. The possibilities with these bags are endless. It is pretty cool to tell people that the bag is made using duct tape and staples too!

Thanks for stopping by!

Tuesday, May 3, 2011

Birthday Cake For a Dog and Cupcakes For You


Meet Pence. He is my daughter's dog. He was sold to her as a Beagle/Border Collie Cross. This is a picture of him when he was six months old. He definitely has some other breed in him as he is HUGE now. Most people guess it is Great Dane. What do you think?
Whatever breed he is - it is a good mix. He is such a good dog. My daughter has trained him to do all sorts of tricks - SIT, DOWN, ROLL OVER, BANG (he falls down like he is dead), SPIN, CRAWL, STAY and HIGH FIVE. This dog does not bark. To go outside he rings a bell. When he wants to get up, he yawns - trying to wake my daughter up politely. He is so cute. I just love this guy to pieces. 

He celebrated his first birthday last week. I suggested to my daughter that she make him a cake. This is what she did: 


Ingredients:  a can of dog food and some dog biscuits. My daughter reformed the dog food in an individual sized pot pie plate and plopped it on to another plate, then she put dog biscuits around the base. A simple special cake for the birthday boy - and boy did he love it!


Then I made cupcakes for the humans in the house, and topped them with doggie biscuits, or I should say, gingerbread cookies shaped into dog biscuits. Get the gingerbread cookie recipe I use by clicking

Check out my other dog related posts


Thanks for stopping by!
Linking up to....
Debbie Doos Pet Party

Saturday, April 30, 2011

Carpet Scrap Transformation - Door Mat Tutorial


 I am so excited about this project! I wanted to join in on the April Ucreate "Create With Me" challenge, which was to paint a rug. I didn't want to buy a rug to paint as I didn't need one - so I wasn't expecting to  partake in this challenge. Then one day I walked by my back door and saw this....


...and a light bulb went on. This is an old carpet scrap that came with our house when we bought it. I don't like throwing things away so it got stuck at the back door. This challenge was just what I needed to come out of my creative shell and do something I have never done before. This carpet scrap was getting a transformation. 

Here is what I did:
1) Prep the carpet: I washed the mat as best I could with a carpet cleaner. After it was dry I vacuumed it. 


2) Cut the carpet: I cut the carpet into a crescent shape. I drew the lines on the back and cut with an exacto knife and scissors. 

3) Paint: After a little bit of reading up on how to paint a carpet, I decided to buy latex paint. This little can was about $5 and I really didn't use much from the can. I stirred the paint with a popsicle stick and painted with an art brush. Latex washed up easily with warm water and soap. I used the carpet scraps to practice painting on to see how the paint went on and what I was going to paint.


I free handed painting on a silhouette of grasses. My inspiration was a stamp I saw in a Stampin Up catalog. I painted a black frame around the whole carpet.

4) Finish Edge: I sewed on an edge to finish the carpet. This took a LONG time. I found the biggest needle in my supplies - this was in my great grandmothers sewing kit. I used jute for the thread. I hammered the needle through the carpet - making sure I had the a double layer of scrap carpet underneath to save my floor. I had to start a new thread once in a while so each time I needed new thread I would double knot it on the bottom of the mat and cut off the excess jute. 


Four hockey games later, two of them overtime games,  I finished the edge of my mat. 

I am so excited about this transformation! My husband likes it so much he wants it at the front door.
Thanks for stopping by!

Linking up to....
The Stories of A2Z
Metamorphosis Monday
Sisters of the Wild West

Tip Junkie handmade projectsUndertheTableandDreaming 


A Marvelous Mess

Friday, April 29, 2011

What You Mean to Me - Deluxe Mother's Day Card


These cards are actually called envelope albums. I made an album for my mom for her birthday (pictured above) and I made an album for my mother in-law for Mother's Day (pictured below). I can't say enough about how well these cards went over. What mother doesn't want in writing how her child feels about her?

I have a tutorial on how to make these HERE on a post called - Gift Idea for Dad.


Fill your album with pictures, quotes, memories and feelings. The picture above is one of the pocket pull outs I made. 


A picture that I didn't put in the tutorial was the envelopes and how they went together. I used three envelopes for my album, you can use more. Glue the flap to the back of the other envelope to make the album. Basically, you will cover this with paper, including making pages for the pockets. 


Here is a picture of an album (the one I gave my husband for an anniversary card) to give you an idea of how it is laid out. The top picture is the pocket side up - and the bottom picture is the pocket side down. 
The "pocket side up" pages, I added little pockets with a quote on each pocket, and then a tag inside each pocket that included memories, compliments, and heartfelt thanks. 


And when it is all folded this is what it looks like.

Here is a PDF file of the Mother related quotes I used in the album...

Mother Quotes

I hope this gives you some inspiration for Mother's Day.
Thanks for stopping by!

Linked up to


Thursday, April 28, 2011

Mother's Day Gift Idea: Woodsies Flower in Pot


I think the cutest little gift my daughter made for her grandmother's was a little woodsies flower. This is the only pic I have of it so it is difficult to see - but the paper piecing flower on this scrapbook page gives you kind of the idea.  The supplies are:
woodsies flower
woodsies leaf shapes
small woodsies heart (optional)
popsicle stick
paint
permanent marker
plaster of paris
small clay flower pot
tacky glue
moss 

Directions:
1. Paint the flower pot desired colors. We painted the brim white and the base striped green and light green. It sort of looked like watermelon colors.
2. Paint the woodsies desired colors. 
3. Draw on flower face with a sharpie.  Outline the leaves and stem with dotted lines if desired. 
4. Mix plaster of paris according to package directions and pour in clay pot. Insert popsicle stick, making sure to leave enough of the stick above to glue on leaves and flowers. Hold until set or prop upright with books or something so it stays centered.
5. Glue flower together. 
6. On the front of the flower pot write "I heart grandma"or whoever you are giving it to. 
I like the look of a tiny heart woodsie for the heart. 
7. Put moss on top of plaster in pot. Glue to secure. 


And there you have it. A cute little gift that the little ones can help make. 

Linked up to....


Childmade