Friday, April 26, 2013

Happily Ever After Marriage Survival Kit


Hello! Welcome to my blog! This year, the weddings started early. I am big on giving presents that are unique, and I have a reputation now for giving survival kits. I do have another wedding survival kit theme coming soon.... but first, let me show you this one.


The theme of this survival kit was inspired by all those fairy tales that end with the saying - "and they lived happily ever after". It would be nice to live happily ever after, and the reality is you can, but it will take work - hence the survival guide on how to do that. 


I came up with all sorts of story like sayings and I bought some handy household items to go with those sayings. I made a tag for each item that also had some marriage advice in the pocket that went with the particular topic I was going for. Let's go through them.

1. Item I purchased - CLOCK - saying to go with it:

Once upon a time there was a young prince and princess who fell in love and got married. Their love was so grand, their love was so divine, they promised each other to uphold that love throughout all TIME.

2. Item I purchased - FLASHLIGHT/LAMP - saying to go with it:

Let light reign over dark by continually rekindling your spark.


3. Item I purchased - CUTTING BOARD - saying to go with it:
All great kingdoms face an evil threat. The enemy will indeed attack, but a strong kingdom will fortify and protect.


4. Item I purchased - FORK LIFTER - saying to go with it:
The greatest heroes and heroines are those who rescue another by lifting them to higher ground.

5. (not pictured here) Item I purchased - GRATER - saying to go with it:
Royal treatment is bestowed when appreciation and gratitude are made known.


Each tag is made from an 8 1/2 x11 piece of card stock. One piece of paper makes two tags. The bottom is folded up to make a pocket. The edges  are sewn to hold it together.  The tags make a booklet after the gift is opened. The title page I attached to the outside of the present. It is the only page without a pocket.


Click Here for PDF file of the tags. Have fun, and thank you for stopping by!
Linking up to...

Tuesday, April 16, 2013

Cutting Board Makeover


Hello! Welcome to my blog!
I have a glass cutting board that has been screaming for a while now for me to do some sort of makeover to it. It used to have a black backing that wore out so I removed it. 
I found some awesome wrapping paper at Winners/Homesense.


 I love old newsprint!
So.... I cut the paper the size of the cutting board. I colored in a few red areas on the paper to go with the red accessories in my kitchen. Then I mod podged the paper to the cutting board. I did a few coats
of Mod Podge as it is a cutting board that I do wash and it always sits on my counter so it needs to be water proof. When everything was dry I took an exacto knife and cut the edges of the paper that were too large for the board. I added Mod Podge to those cut parts to seal the edges.

It has been a week now since I have made the cutting board. I was not sure how it would hold up - this was definitely a "try"al. So far so good. Keep in mind - I do not submerse it in water - but I do put it over my sink and wash it with a very wet cloth, striving not to get the back wet. 


I absolutely love the new look!
Thanks for stopping by!

Linking up to....

Lil\'Luna

Sunday, April 14, 2013

Sacrifice Quote


I love Neal A. Maxwell. This was taken from a talk called "Deny Yourselves of All Ungodliness". Any of Neal A. Maxwell talks are worth studying. He was a well educated, well versed amazing man.

View the talk below!
Thank you for stopping by!!

Sunday, March 31, 2013

Scripture Easter Goodie Bag


Hello! Happy Easter!
I wanted to make some goodie bags that had something to do with the true meaning of Easter. I used a glassine bag. The first item in the bag was a print out of lyrics from the song - "He is Risen".
Then I made three paper eggs that had a scripture on the front and a quote on the back. I did add some thin Lindt wrapped chocolates to the middle of the eggs and glued the front and back of the eggs together.


I put all the contents in the glassine bag, folded the top down. I made the bag topper out of a doily, folded in half and I glued on some paper flowers I made from scrapbook paper and book paper. I stapled the topper to the bag. I printed out the tag in cream card stock (it is hard to tell with the picture)

Thank you for stopping by! I wish you all a happy Easter!
I am also sharing one of my favorite songs about the Savior which fits this season called
"Oh Lord, My Redeemer" by Jeff Goodrich.


Saturday, March 23, 2013

Easter Candy Bouquet


Hello! Welcome to my blog!
A new craft passion of mine has been making candy bouquets. With Easter coming up, I knew this project would be a lot of fun with the variety of candy available, and of course the lovely colors that go with this season. 
I have been using empty bean cans for my bases as they are frugal and I love to creatively recycle. I prepare the base by putting a few rocks in the bottom of the can and I pour some plaster over them to secure. Then I glue a styrofoam ball on top of the dried plaster. I added grass to fill the can. Then I added prepared skewers to the styrofoam ball, rearranging them until I got the look I wanted.


Click HERE to see the candy bouquet I made for Valentine's Day.


The phrase and the chocolate bunnies were cut out with a Cricut using the Create a Critter cartridge.
I am going to have to make a few more of these. They are fun to make and even more fun to give away. Thanks for stopping by!


Friday, March 22, 2013

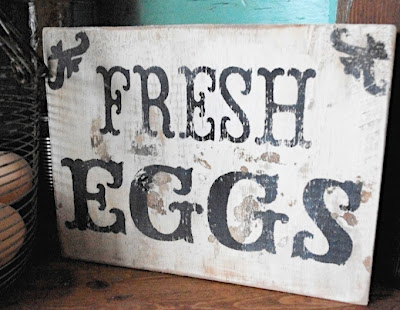
Fresh Eggs Wood Sign


Hello! Welcome to my blog!
My mom recently gave me a rusty egg basket. I found the cutest natural plastic eggs at a dollar store. Thank goodness for Easter time. The egg basket was pretty lonely on the shelf that I put it on, so I painted a sign to go with it. 


I found a scrap piece of 2x12 that was a perfect for this project. I painted the wood white. To make a stencil - I cut out the letters on my Cricut with the Story Time cartridge. The corners were from the same cartridge. After letting the paint dry I power sanded over the whole sign.

Included in the above picture are paper carrots (click here for tutorial) and 

Thanks for stopping by!

Linking up to....


Tuesday, March 5, 2013

St. Patrick's Day Quote Rocks


Hello! Welcome to my blog!
I love the Irish blessings and lucky quotes that are to be found out there. I made some quote rocks for Thanksgiving and I decided to do the same for St. Patrick's Day.


When I made the Thanksgiving quote rocks (CLICK HERE TO VIEW), I printed out the quotes and transferred them to the rocks using pencil on the opposite side of the paper, tracing over the letters, and then filling in the transferred areas with permanent marker. This time I reversed the quotes on my computer, placed the printer ink side down on the rock and colored the blank side with pencil. This transferred the printer ink on to the rock. Then I filled in the transferred ink in with permanent marker. This worked much better.


Here are the quotes I used. I had to shorten some to fit on the rocks I had.


Thanks for stopping by!