Sunday, November 24, 2013

Woman of God Survival Kit

 Hello! Welcome to my blog! I made this gift last year and didn't have to time to post it on my blog in time for Christmas. I have given this gift to people that I work closely with at church over the years. Although I hope they find value in the gift, I know that I always benefit from it as I ponder the analogies and lessons with each item. Here is what I put in the gift....

 1. Love the Lord with all your heart - HEART ORNAMENT

2. Reflect on your divine nature - MIRROR.


3. Draw close to your Heavenly Father and Jesus Christ - PEN AND PAPER

4. Don't waster energy - FLORESCENT BULB

5. Feast on the delicious fruit - MINI FRUIT PIE

HERE ARE THE TAGS.....


HERE ARE THE SAYINGS I PUT ON THE BACK SIDE OF EACH TAG
*Quotes from The Church of Jesus Christ of Latter-day Saints leaders*


Wrap it up pretty and there you go!!


Thanks for stopping by!

Saturday, November 23, 2013

DIY Photo Christmas Card


Hi! Welcome to my blog! I haven't been on my blog for months, and now two posts in two days. Christmas must be just around the corner!! I wanted to share the card I made for this year. The details of the fonts and dings I used are in the picture below.


And here is the background.... Put a nice deep red border around it to make it pop!


Thanks for stopping by!


Friday, November 22, 2013

Christmas Tree Advent Calendar


I have been on a little bit of a hiatus from my blog due to going back to school and such but it is great to be back crafting and blogging. Christmas is right around the corner and I needed to make my daughter a new advent calendar. She has moved out and so I thought she might need a little Christmas cheer in her new place. Here is how I made it....

1. I wrapped a styrofoam cone with greenery garland, then glued the tree into a medium tuna can that I covered with Christmas scrapbook paper. 
2. The ornaments on the tree are mini envelopes that I sliced the tops off of. I stuck a wire into the tree that I made a loop in the end to attach a mini clothespin to hang. The wire was about 3 inches, folded in half and then twisted together at the end leaving a loop at the fold.
 3. I wrapped match boxes and added ribbon with a mini tag to hold the number.

4. I made mini versions of the box bag that I love to make CLICK HERE FOR TUTORIAL. The cardboard for the bottom measures 2"x2". The paper measured 4 1/2 inches length and 3 inches height. I cut off the top of the bag with decorative scissors.

5. I bought a decorative plate from Michael's for 69 cents ( Halloween/Thanksgiving clearance ). They have them coming up for sale this week for a great deal as well - not 69 cents but as good as you will get before Christmas.

I wanted to make this advent calendar refillable, hence the bags, boxes and envelopes. I have a mini set of lights that I might add to it as well. 

Check out my other advent calendars ...

Silhouette and cork advent boxes.

Advent box tutorial


Christmas Countdown Blocks

Thanks for stopping by!

Tuesday, August 20, 2013

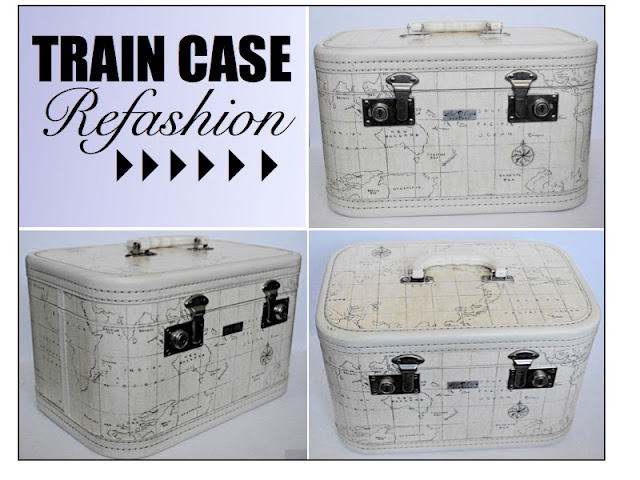
Train Case Re-fashion

 Hello! Welcome to my blog! I have been enjoying my summer holidays, and with my last post being two months ago, I am obviously taken a holiday from my blog. Speaking of holidays, I have been refashioning a set of luggage that found at at second hand store (score!!!)
The first piece I am refashioning in my new luggage set is this adorable train case. I had purchased a roll of map wallpaper for $1 at Liquidation World (another score) and it has been waiting for a project such as this.


I am so excited about how this turned out.


Tuesday, June 25, 2013

Canada Day Printables

 Canada Day is coming soon. I made a couple printable quotes. The quotes are my favorite words from the National Anthem.
Thanks for stopping by!

Friday, June 21, 2013

Tin Transformation


Hello! Welcome to my blog!

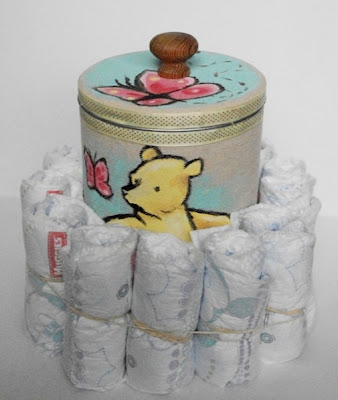
I was looking for a center object for a diaper cake. On tutorials that I read, a lot of people used a roll of paper towel. I wanted to try something different. In my stash I had a tin container that was waiting for a project such as this. My diaper cake had a Winnie the Pooh theme, so I wanted to make this a Winnie the Pooh tin. 


I mod podged some drop cloth on the lid and around the perimeter of the tin. I added ribbon to cover the edges. Then I got my daughter to paint Pooh on the tin and a butterfly on the lid. I added a drawer pull to the lid 


This is the start of the diaper cake. I will post it soon.
Thanks for stopping by!

Linking up to...


Tuesday, June 11, 2013

Dad, You Are Wheelie Great - Father's Day Gift


 I seen a card somewhere on Pinterest with this saying - "Dad - You are Wheelie Great!" The saying is perfect for my husband for Father's Day. I was originally going to make this a candy bouquet, but it turned out to be more like a big 3D card with candy and sweets in it.
Here is what I did:


1. I started with a base from a waxed paper box. I cut off the top and wrapped it in kraft paper.
2. I cut out green card stock (different tones) and glued a short one on the front of the box and a taller one to the inside back of the box.
2. I loaded the base with packaged M&M's and peanuts, and then I dumped chocolate covered almonds on top to give a rocky road effect.
3. I glued card stock bike rider images (FIND IMAGE HERE) to the grass scenery that I previously glued wrapped Oreo cookies to. I printed out extra images to glue the tire area of the image to the front of the cookie to cover them.
4. I glued paper grass cut outs here and there to the green areas.
5. I glued two pieces of cardboard (that was about 1/4 inch depth) to the back of the tall greenery to give the display some depth. Then I glued a scenery background that I printed off my computer. Find image HERE.


I printed out the saying I made - and ended up cutting it to make it fit.


My daughter is going to make a movie to go with this gift from clips off her dad's GoPro from rides he has recorded. It will make for a wheelie great gift!!

Thanks for stopping by!

Linking up to...

Lil\'Luna

Friday, June 7, 2013

New Dad Special Operations Kit


Welcome to my blog! I have been busy, busy with Father's Day preparations. This gift pack is geared towards new dad's with the goal of prepping them in a fun way for their future important mission of being an awesome dad.
Here is what I put in the kit:
There were four envelopes. Each one of them contained items that corresponded to a special mission.
Mission #1 Operation James Bond Time
This envelope contained items to help with daddy/baby time. I purchased a book called "We Belong Together" by Joyce Wan (this book is adorable - great art and textured) and a toy.


Mission #2 Operation Stealth Mode
This envelope contained items that may encourage sleep. I purchased soothers, a receiving blanket and an eye cover. 


 Mission #3 Diffuse the Bomb
This envelope contained items to help daddy with diaper changing duty - wipes, diapers, and a garbage bag with a warning label "Danger Hazardous Waste"


 Mission #4 Flaming Fire
This envelope contained a match book I made with tips on Mommy and Daddy relations.


I put the envelopes in a box I covered with kraft paper (it was a square pop box cut in half)
and I glued the special mission letter to it:


Here are the tags for each envelope:


This was a lot of fun and rewarding to give!
Do you know someone who is going to be a new daddy soon? Why don't you give this a try?

Thanks for stopping by!


Friday, May 31, 2013

Father's Day Plant Pick


Hello! Welcome to Creative "Try"als!
Last year for a gift for "the Dad's" at my church, we gave cookies along with this - 
a bean plant with a quote on a paint stick. This craft is extremely easy if you have a wood burning kit.


I bought one from Michael's a couple years ago and it has been a very handy tool. The tool comes with different points and I used the transfer point to transfer the image.

I typed up the words, reversed them,  printed them and then got a laser copy - the ink jet copy does not work - I tried :(
Here is the image below if you would like to try it....
Right click, copy, paste in your favorite publishing program, resize as desired, print and then laser print at a photocopy place if you don't own have a laser printer.


The bean was planted in a little espresso cup (it took about two weeks to get a decent size) and we wrapped the cup and part of the plant with cellophane. 

Why don't you give it a try?

Thanks for stopping by!

Linking up to...

Friday, May 24, 2013

Life is a Picnic - Marriage Survival Kit


Hello! Welcome to my blog!
I love to give practical yet unique gifts. I have made quite a few marriage survival kits. I am always trying to come up with new ideas so that the recipients have no idea what they are getting - other than they know they will probably get a survival kit. I thought a picnic theme was good for a spring/summer wedding gift. Here is what I put in it:


1. Item I purchased - LAWN BLANKET - saying to go with it:
TAKE TIME TO RELAX AND GET WRAPPED UP IN EACH OTHER

2. Item I purchased - THERMOS - saying to go with it:
LIVE WITHIN THE WARMTH OF EACH OTHER'S HEART


3. Item I purchased - BUG NET - saying to go with it:
KEEP THE BUGS OUT


4. Item I purchased - ICE PACK - saying to go with it:
KEEP YOUR COOL

5. Item I purchased - WATER BOTTLES WITH LEMONADE PACKETS - saying to go with it:
WHEN LIFE GIVE YOU LEMONS MAKE LEMONADE

6. Item I purchased - FOOD CONTAINERS - saying to go with them:
FRESH IS BEST - DON'T LET YOUR LOVE GO STALE


I originally was going to give this gift in a picnic bag that I made out of a table cloth (one of those plastic ones from the dollar store) then I changed my mind and purchased a cooler. I still put everything in the bag, then I put the bag in the cooler. Check out my tutorial HERE on how to make a no sew bag (with duct tape and staples). I made this bag the same way except I sewed it (seriously easier to zip it up with a machine if you have one). I also added a few pockets.


With the left overs from the table cloth I made a bow and ribbon. This is the first time making a bow, and I think it turned out pretty good. I love that the ribbon goes with the theme.


Of course - with most of my survival kits I like to include marriage advice. For the tags and the marriage advice click HERE.

If you have ideas that would work with this kit or any other comments I would love for you to drop me a line. Thank you for stopping by!


Check out my latest marriage survival kits - Happy Camper CLICK HERE


Reap What You Sow - CLICK HERE


***Some people have had issues accessing the tags (the lovely world of technology). If you have a problem please email me rather than leaving a comment about it. I do read my comments but not daily so if you are having problems and in a rush an email is the best way to get in touch with me.