Hello! Welcome to my blog! This summer I was released as my ward's Relief Society president. I had been serving in that capacity for five years. I am on to a new calling and a new adventure - Stake Primary President! One of the things we wanted to have as a Stake Primary Presidency was an orientation package for new Primary Presidencies. Our Stake covers a very large area. My first visit to one of the wards in my stake was a 3 1/2 hour drive. We wanted something we could send through the internet just in case we are not able to get to visit in person right away. We will also have hard copies on hand - however, the online pdf has hyperlinks to important resources. The General Primary Presidency has a fantastic orientation package of their own, online and through the Gospel Library app, so I linked up to that (why re-invent the wheel right?), and added some basic training on how to access resources. I am thinking of making a teacher orientation package too. I will find out if Primary Presidents feel it would be helpful. I am sharing this hoping it will help someone or inspire your own orientation package. Find the pdf file HERE. The first page has a blank bottom for you to put your presidency information. The picture of President Nelson in the package is from Susan Fitch. Check out her awesome website HERE! Thanks for stopping by!
Hello! Welcome to my blog! My sister got married last summer. What do you give someone who has everything? A creative gift of course! Since survival kits are my thing - my sister was definitely getting one. She already got a wedding day survival kit for her bridal shower. When giving marriage survival kits I try to think of what the couple is interested in. I also consider what season of the year we are in. My brother in law was big time into camping and my sister, well, not so much. I thought a happy camper marriage survival kit was perfect! I had already made a Happy Camper marriage survival kit for an anniversary present (CLICK HERE TO SEE IT) but I wanted to update the graphics and also I purchased a few different things as well. I borrowed ideas from other survival kits I have made as well (CLICK HERE TO SEE ALL MY SURVIVAL KITS).
Here is a list of what ended up in this one:
I love shopping at Winners as I can find nice unique stuff there. I lucked out to find adventure/travel type merchandise like the water bottle and flashlight. I purchased a really nice blanket there as well.
I put it all in a bag that I found at Hobby Lobby when I went on a trip to the States.
The tags can be found HERE. They are free to download for personal use. I like to put quotes with the tags so if you are into the quotes, cut them out and paste them to the back of the corresponding graphic.
I hope this gives you some ideas for your next creative gift! If you make one I would love to hear if you came up with any different sayings.
Welcome to my blog! My sister got married last year and I made her a wedding day survival kit. Survival kits are my thing. I love unique and creative gifts and if you have been to my blog before, you have seen a lot of survival kits. Check out my other wedding day survival kit HERE - it is boring but pretty.
My sister had a natural theme for her wedding so I wanted to go with that theme. First thing I needed to do was find a bag I liked to fit some stuff and the kit took off from there. I found this bag in the cosmetic bag section at Winners.
Winners also had some cute supplies in their cosmetics and travel section. I found the lip balm, a travel sewing kit, and lotion there.
Here is a list of the contents along with the saying I put with the items. I wanted some kind of snack - I chose a Clif bar because my brother-in-law's name is Cliff, so this was very handy. I had a different saying on the tag - for a personalized touch (You raised the bar when you found Cliff! Feed your adventure!)
My sister loved the gift and it came in handy at the wedding. The tags are free for personal use. For the tags go HERE.
Stay tuned for the wedding gift I made her - Happy Campers Marriage Survival Kit!
Cross another one off the bucket list! We had a great trip to Yosemite! After reading a ton of articles about this park for a year on what we should do when we were in Yosemite - the Mist Trail was number one on our list.
I read lots of posts about this hike.
When doing my investigating into this hike I wanted to know:
How much time do I need?
*answers are based on my experience and different circumstances could change the outcomes*
When I looked into this - I got the impression this hike would take 5-6 hours.
It took us four hours. That includes lots of stops for pictures, eating, rest, getting gear on and off, etc. My husband and I are not athletes and not the youngest chickens in the pen. On the other hand, we do a fair amount of hiking. There were definitely some people I seen that had a difficult time with this hike which seemed surprising as they looked like they were not in bad shape. There were also some who totally surprised me that they could get to where they were because of age or mobility issues.
Below is a recap of how our hike played out.
What time of day should I go?
We were at Yosemite on a Friday at the end of June. From my studies - a lot of people suggested to go early to beat the crowds. This was not an option for us as we stayed outside the park at Oakhurst. We left our hotel at 7 AM and got to the parking area at 8:30. We read we could park in the trailhead parking if we got there early enough. The trailhead parking was FULL, but there was plenty of parking available on the side of the road. I was not sure if this was allowed as no other cars at that time were parked on the side of the road- but there were no "NO PARKING" signs where we parked. There were markers indicating the side of the road - which we thought was an indication that as long as our vehicle was inside that line it would be be fine - and it was.
When we got to the bathrooms at Happy Isles (8:43 AM) there was a long line up for the women's bathroom, but it moved fairly fast.
Heading up the trail it was not terribly crowded, but we were not lonely either.
Coming down the trail at the bottom of the mountain it was super crowded.
I was happy with the time we were able to start the Mist Trail.
Temperature wise - it was perfect. The high for the day we went was 21 degrees celsius (69 degrees fahrenheit).
What should I bring with me?
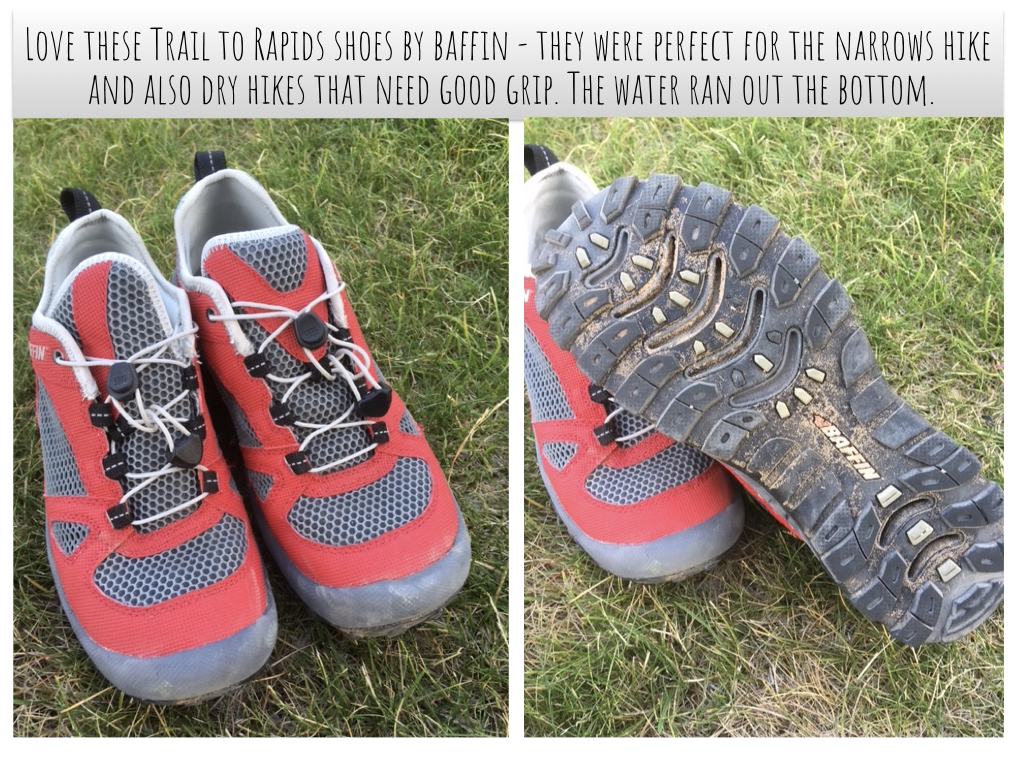
I took a backpack with water, a lunch, the park map, sunscreen, and a camera in a ziplock bag. We packed rain ponchos to put on when we got close to Vernal Falls. We wore good quality trail to rapid shoes. You need good grip going up the wet stones. There were also places that were totally immersed in water going up the steps on the Mist Trail. Depending on the time of year - your feet will get wet. Going down the John Muir trail there was a wet part that we had to step through water. There was a lot of water run off and a part of the trail was flooded. It wasn't too muddy though as there was a lot of rocks to avoid the mud. Some people brought a change of shoes. Our shoes were for water and the trail so we were fine.
I seen some people with walking poles - I prefer not to have them as I like my hands free. When climbing it is suggested to use your arms to help you when you can to save leg strength.
Watch the video for a recap of the hike
What did I learn?
PARKING - When we left our vehicle at 8:30 in the morning we were the only ones parked on the side of the road. When we got back to our vehicle the road parking was packed. Someone parked right behind us - not giving us any room if we had to back up. We did park so we were the first vehicle, but if someone tried to squeeze in front of us we would have been stuck. We noticed driving out that a lot of vehicles parked on the side of the road were a real tight fit and figured there were some that would have a hard time getting out. As we left the Arch Rock entrance we noticed tons of parking, but where we were at the end of where you can drive to it was packed.
PLANNING - I had planned when we got back to the valley from the hike, that we could explore the valley if we had the energy. We did not - we were done. Even though the hike was 1 hour shorter than I anticipated, we did not have the energy to do anything else on that day. With an hour and a half drive back to our hotel it made for a pretty long day.
We had a great experience! I have hiked to falls before, but never close enough to get drenched by them. It is pretty cool hiking up not only one falls but two. It was great to go down the John Muir trail to experience different scenery. We came across some people going down the Mist Trail as we were going up - a mom and young girl. It looked challenging going down as not only do you have to navigate the steps, but the crowds too. What did you learn/love about this hike?
Hello! Welcome to my blog! I love making unique gift baskets. Check out this one I made for Mother's Day 2018. It is a raisin theme. My daughter made me an adorable card a couple years ago with this saying and I loved it. I thought this would make a lovely idea for a gift basket!
In the basket I put:
1. chocolate covered raisins
2. raisin bread
3. homemade Jumbo Raisin cookies
4. lavender plant
I wrapped a box with birch bark wrapping paper, tied some purple tulle around it and printed out the tag I made. The tag below can be used for personal use only.
Hello! Welcome to my blog! I am a couple years behind on putting my Mother's Day gifts on my blog, so my next few posts will be ideas for Mother's Day. In 2017 I used a tea theme for a gift basket. For this gift basket I used a wood box, a mug filled with wrapped chocolates, a potted plant, bags with tea and fancy sugar.
I made the sugar cubes by adding a little bit of water to regular sugar, and then I pressed the moist sugar into a clay mold. Of course you want your mold to be small. Let dry. I let mine sit over night. They turned out really cute!
Here are some of the tags I made. You are free to use them for personal use.
Hello! Welcome to my blog! This project has been on my mind for years - and this summer I found some time to do it. Some reasons it was hard to get started: 1. Out of the tons of pictures I have, which ones should I use? 2. What should the layout be?
3. What frames should I buy?
This photo wall cost me less than $12. It is not that I did not have money to spend, just why spend more money I you have to? I moved into my house ten years ago and never unpacked my framed pictures. I decided I would use the frames I had and use them. The twelve dollars was the fonts (purchased at garage sales) a mirror from the second hand store (which is the frame around the F) the large frame and the square frame. All were purchased not really knowing I would be using it for this wall - I just liked the items so I bought them. The one I intentionally bought for this wall was a plate frame that cost $2 at a second hand store - I painted it to match.
Now for my questions that seemed to put this project on hold for so long: 1. What pictures do I use? - do I put grandma on the wall? What about Aunt Jane? I don't want to leave anyone out right? I decided it would be a photo wall of our immediate family. 2. What should the layout be? - I looked and looked on Pinterest. I had a ton of ideas pinned. I finally decided that the layout would be determined from the frames that I had.
Laying things out on the floor, I started with the biggest frame I had, having no idea what picture would be inside it. I added other frames that kind of made a nice centre arrangement. Then I thought I could do a collage on either side of the centre arrangement - still not really knowing what pictures would go in the frames. Then the ideas of pictures started to come. My ideas were "We have two girls - their grad photos could go in the centre of the two collages and pictures of their lives surrounding that (baby, family, their dogs, their children) and a family picture in the centre."
3. What frames should I buy?- I really only needed to buy one more frame to match the other side of the collage. I had a ton of frames so I did not need to buy more. They were all mis-matchy though so I went to work painting them. (I will post about the frame painting soon). Then another dilemma came up - what colour do I paint them?
It might sound crazy - but I chose my colours from the amount of paint I had. I had a lot of olive green, and light beige. Of course I had those paints because they matched the style and decor of my house. I had purchased the paint from Michael's when they were on sale for $1. I mixed a bit of plaster of paris in the paint so it would stick to the frames as some of them were cheap dollar store frames. Adding plaster of paris in acrylic paint makes it a chalk paint. Then another dilemma I had was - what frames should be green?what frames should be beige? I decided the 5x7 frames from the collage would be green and two frames from the centre piece (since I had more of that paint) and the 4x6 frames from the collage and one from the centre piece would be beige. The big frame would remain black to tie in the letters and the round frames I would paint black. I love how the frames turned out:
With the "family" frame I mod podged burlap on poster board to make it stiff. I hot glued the letters on. The glass is still in the frame I just put it behind the burlap, just in case I want to change this up one day. I purchased these letters at a garage sale for $1 a while back. I wasn't sure what I was going to do with them - but they just happened to fit perfectly into this frame and so on the photo well they went.
I loved this tip before putting the pictures up. I traced all the frames on to paper and did a mock set up on the wall. This was extremely helpful. I rearranged the pictures after I took this picture. I noticed the collages were further away than I wanted them to be from the centrepiece.
It feels so good to have this completed. The awesome thing was my husband was excited to help me hang this up because it looked so good! Usually he cringes when it comes to putting a nail in our walls. He is going to build me a console table to go under this so stay tuned!
Hello! Welcome to my blog! A couple of summers ago I made a ranch sign for my mom. Instead of painting the information on it I wood burned it. I only have a little wood burner so the wood burning took quite a while to do (the sign is about 4'x5'). The sign just went up this spring so I was able to get a picture of it where it was intended to hang.
I was happy how the sign turned out. I burned out some of the plywood along the edges to give the worn look. I also burned the wood with a torch.
On a smaller piece of plywood I wood burned a scenery that my daughter drew for me (she is the artist, not me). I wanted to do it on a separate piece of wood just in case I messed up.
After I wood burned I put on three coats of clear Varathane. In hind sight I would have chosen a lightly stained Varathane to give the wood a more aged look.
It will be interesting to see how this weathers. I wood burned a little sign for my aunt and the burnt part of the wood came off leaving just an impression of the font, and basically you can't read the sign. She painted black paint over the font so we can see what it says now. I did not put Varathane on her signs. I will have to do a post in a couple of years showing how the ranch sign weathers.
Hello! Welcome to my blog! Just a super quick post today. Last year I suggested to my husband that he make things for me as possible ideas for birthday / Christmas presents. I showed him some of my PINS and he made three wood items! What a score!! This is post #3 of the three items he made. I had seen on Pinterest wooden Christmas trees with shelves and hangers that knick knacks can go on, and just loved that idea. Although I wanted that tree idea but in a house shape, my hubby made me the tree. I loved it! Post #2 of the three gifts explains the whole story. Click here to know more and see the other gift.
Hello! Welcome to my blog! Last year I suggested to my husband that he make things for me as possible ideas for birthday / Christmas presents. I showed him some of my PINS and he made three wood items! What a score. This is post #2 of the three items he made.I had seen on Pinterest wooden Christmas trees with shelves and hangers that knick knacks can go on, and just loved that idea - but I wanted it up all year. I explained to him that I wanted the wooden tree idea - but in a house shape. He misunderstood and made me the tree. I will be posting about that next. He asked if the tree is what I was talking about. I hesitantly explained it too him, because I loved the tree and didn't want to seem ungrateful. He said he wanted to make me the house and he worked on it with lots of input from me.
He did not buy any wood. He used up wood that was laying around. He was excited to use some rustic wood scraps for the shelves.
Once the house was all put together I had to figure out the hangers and the decor. I plan to switch up the knick knacks depending on the seasons.
I found the words at Michael's and gave them a white wash paint. I love how the "y" in family hangs off the shelf. I made the house with scraps. I didn't even have to cut them - they were in our garbage. The bottom of the house is a wood block that I used to test colours for my wood sign (which was gift #1 click here to see it) - so it matches the sign I painted.
I am so happy how this turned out - and I get lots of comments on it. It is hanging at our entrance.
Hello! Welcome to my blog! Last year I had the brilliant idea of asking my husband to make things for me as possibilities for birthday / Christmas presents. I showed him some of my PINS and he made three wood items! What a score. The first one I am blogging about is the wood sign. He made the sign out of scrap wood that was laying around our place. It was given to me as a blank slate, and I decorated it.
I love the farmhouse style decor. I purchased the chickens from Hobby Lobby. It is one of my "must go to" stops when we are in the United States.
I don't own a Silhouette, and I didn't like any of the font cartridges I had on my Circuit - so I made my own stencil with card stock. When I was painting somehow the stencil slipped while painting "this" so it is a little crooked. It bothers me something awful, but I will live with it until I redesign the sign.
On the way to Moab from Salt Lake we took a little side trip to Dead Horse State Park.
The drive on highway 313 was very scenic. This is the highway that takes you to the Island in the Sky Viewpoint. We arrived in the heat of the day - around noon - on a scorching hot July 1.
I had done a lot of studying. I thought I knew how much the entrance fee was going to be as the State Park website I had read a few days prior said $15. It also said there was a Senior admittance rate of $10. The lady at the entrance asked for twenty dollars. I was confused. We asked for the Seniors rate and she said they had done away with the Senior discount. I asked about the $15 entry fee - and she said it had recently changed but the website at that time did not. What is a person to do? They have now changed the information on the website. They still have a $5 discount for seniors but you need to be a Utah resident (which it did not indicate before). We paid the entrance fee but it was a little frustrating not having the correct information.
We hiked half the flat West Rim trail. We wanted to walk from the Visitor Center to the overlook but it was way too hot. We walked back to the car and drove to the overlook. We were glad we drove to the overlook. It was lunch time and we decided to have a picnic. There are fantastic picnic areas with the most incredible views.
Lots of picnic tables to choose from. The view was just twenty feet away.
I was chicken to go too close to the edge of the rocks.
It is very high up.
This picture doesn't really show how high up we are until you see how tiny the cars are on the road below.
I loved the overlook that had rails and a beautiful rock wall. The path near the visitor centre is pretty neat too. The bathrooms were nice and clean, but very HOT on a toasty July afternoon. It is about a half hour drive from here to Arches National Park and about a thirty five minute drive to the Hotel we stayed at.
Was it worth the side trip?
We spent just a little over an hour here as our main destination was Moab and Arches National Park. Even though it cost an extra $20 (which meant we spent $100 American - $140 Canadian coin on going to parks) that is what we drove all this way to do. Moab is a 20 hour drive from my house in Canada. We did not come all this way to cheap out and not see these amazing sights. It gave us alittle glimpse of the Canyonlands which we were not able to spend much time in. I can’t say I would come back to that particular park - (I would probably carry on to Island in the Sky which Google maps says is 18 minutes away from Dead Horse State Park) but it was neat to see the Colorado River at this Point.
I am sure there is much more to explore here and the campground with rustic yurts looked interesting. What a view!
I loved the thought of hiking the narrows. I read lots of posts about the hike. I did some preparation
to make this hike the best experience I could.
When doing my investigating into this hike I wanted to know:
How much time do I need?
*answers are based on my experience and different circumstances could change the outcomes*
I studied this out and the information I got was very accurate! I planned on 6 hours and did it in 5 1/2. Here is a breakdown.
Riverside walk ends 1 mile 0.5hr
Mystery Falls 1.4 mile 1hr
Start of Wall Street 2.4 mile 1:50hr
Orderville Canyon 2.5 miles 2hr
End of Wall Street 3.5 miles 2:30hr
Hardest part… deep 4.5 miles 3:30hr
Big Springs 5.0 miles 4hr
We turned around at the end of Wall Street - or at least what I determined to be the end of Wall Street - there are no signs. We left our hotel a little after 6:30AM - and got back to the hotel at 1:00PM.
What time of day should I go?
From my studies - a lot of people suggested to go early to beat the crowds. We decided the day before the hike that we would drive and park at the museum (shuttle stop 2 in the park). We liked the parking there as there were parallel parking options which should mean less door dings. We ended up leaving our hotel a little later then planned because we wanted to eat the continental breakfast which wasn’t served until 6AM. We drove to the park a little after 6:30 - the first shuttle in Springdale would have picked us up at around 7:15, but shuttles in the park start at 6AM. There were about half a dozen others waiting at this shuttle stop. When the shuttle came to pick us up - it was full. We managed to squeeze in and I was standing beside the bus driver. It was a good view out the front window - I just had to hold on for my life. The driver was nice and carefull. I wasn’t sure if we were going so slow because the driver wanted to be cautious or if we were so weighed down the shuttle could not go any faster. We were packed in there like sardines! The other stops had people waiting - but could not get on as the people on the shuttle were getting off at stop 6 (Angel’s Landing) or stop 9 (The Narrows). It was busy even early in the morning. There was a line up for the bathrooms at the shuttle stop. It helped being at the front of the shuttle as I got to the bathrooms at the head of the pack. Once we started on the river walk the crowd thinned out as some people were still at the bathrooms - while others did not stop there. On the hike back it was nuts. It was July 4, so I was expecting it to be busy. We managed our way through the crowds that were in the river and on the river trail. The shuttle bus was not as busy coming back.
Leaving early was good - but don't expect it not to be packed already.
What should I bring with me?
I took a backpack with water, a snack, the park map, sunscreen, and a camera. I purchased special shoes that were awesome. They are Baffin trail to rapid shoes. We wore wool socks with them to help prevent chaffing. My husband made walking sticks out of old hockey sticks. We got some compliments on how creative we were. We thanked them and explained we were from Canada eh! We did consider renting the supplies needed - but we were wanting to get on the trail before the rental place was open and were too cheap to pay for two days. The shoes we purchased will be handy as we are active hikers.
Do I need to prepare anything?
I seen a lot of rented gear being used. I also seen too many people so unprepared it was scary. My eyes bugged out when I seen a lady hiking through the river with a newborn. There was an older gentlemen with no stick trying to navigate a fairly easy part of the river and he almost fell in. I almost fell in a few times with a stick. I seen some people with two sticks. I am not sure if that is better as I needed my other arm to help keep my balance. I read a trick the was helpful - to keep two points of stability on the ground at all times. When one leg is taking a step - your stick and your other leg should be on the ground.
I wore layers - I had to take off my pants as I could not sinch them up any further. I had shorts on underneath. In some areas the water came up to the bottom of my shorts. I was told by someone who spoke to a Ranger that the water level was lower than it had been other years at the beginning of July. We didn’t even get to the deep part. I had my bathing suit on underneath just in case but it did not come to that.
It was like Christmas going to the Narrows. Every step and every turn I took was like a gift of amazing beauty. There is no way to adequately describe what you will see. You will be blown away.
There are some things I wish I did:
take more pictures: I did not want to be constantly looking at the scenery through the lens of a camera, on the other hand, I wish I did take more pictures, or at least video of my husband and I striving to navigate through the river. I think that would have been a great video to have.
closest picture of my husband trekking through the water. A close up would have been good.
I wish I knew where I was in the Canyon. There are no trail markers. I knew this before hand but I thought from all my studying that I would be able to remember where I was. The only thing I did remember was the Orderville Canyon. There were some people confused when we got to this point. I was able to tell them which one was the main canyon - and that the other one was a side canyon they could explore. I suggested if they were here for the popular attractions - take the main canyon, if they had to choose between the two. I have since found a map - CLICK HERE - which I suggest to take a screen shot of so you have it handy on your camera if you need to reference it.