Sunday, December 23, 2012

Gift Topper Ideas and Wrapping with Kraft Paper

 Gift wrapping is one of my favorite things to do!! I love kraft paper and I LOVE getting creative with gift toppers. Here are some ideas that I have done:


I love black and white ribbon with kraft paper. This ribbon was actually Halloween stock that I got for a good discount at Michael's. I added a kraft paper tag and a rusted out jingle bell to this gift. Check out  the tutorial on how to rust medal HERE!


These gift toppers pictured above and below are clay ornaments (made from baking soda clay - click here for recipe and tutorial). I then Mod podged a piece of book page on the tag that I had stamped and colored. I attached the ornaments with jute.


The next two gifts were fun to decorate!


 I like to buy ribbon from a fabric store and it is amazing the variety that can be found there and sometimes for a great deal. I liked the black and white gingham that I found - and I love to put red with black and white. I purchased a ceramic bird ornament that came complete with a clip so it was easy to attach to a bit of greenery and the ribbon.


I love how this gift turned out for my sister. I used champagne ribbon purchased from a fabric store. I found some odds and ends greenery from a really old candle set that I was going to throw out because it was cheesy looking- however the greenery was worth saving. I printed out a music sheet image onto card stock and cut two skates from my Cricut. I inked the skates edges, put a hole in the top, added a bit of tulling, and added pearl string to attached to the ribbon. I also added iridescent glitter to the skates. I love how this turned out.

I hope these ideas help you with some creative gift wrapping. Remember to have fun!!!
Merry Christmas!


Saturday, December 22, 2012

Gift Wrap Survival Kit For Your Man


Last year I made a gift wrap survival kit for a present. One of my followers suggested that this would make a perfect idea for the man in your life or your kid's. I thought that was a wonderful idea and I needed to make one for my husband. I have a confession to make. I LOVE beautifully gift wrapped presents - which I strive to give - and to be honest I feel a little bummed out when my presents are thrown into a dollar store bag. So yes, I will admit this is a bit of a self indulgent gift from me to my husband in the hopes that the gifts under the tree have eye candy appeal.


I bought wrapping paper and ribbon that I liked. I printed out some tags, and used a couple stamped images to make tags that matched the wrapping paper. After I cut out the tags I glittered the edges with Mod Podge and champagne glitter. The really cool tag above in the center is a free digi stamp download that I found via Pinterest. Here is a link to get the free stamp - CLICK HERE. The tags on the bottom are free printable from
  The Winter Wonderland Holiday Tags by Three Little Monkeys Studio.
The other tags are from stamps.


I gathered all the little bits and put it in a clear plastic bag with a zipper (left over from a sheet set). Then I stapled on a print out from the survival kit I made last year (CLICK HERE to go to the link). I gave my hubby the bag, boxes and gift wrap and he was thrilled. When I came home from work that day he had all his gifts wrapped and he said he actually enjoyed wrapping the presents this year. And I must say - they look fabulous!!


Thanks for stopping by!!

Thursday, December 6, 2012

Christmas 2012 Card - Make Your Own, It's Easy!!


Here is this year's Christmas card that I made. I don't have any fancy program - I use my slideshow program called Keynote. CLICK HERE for the tutorial...

Now, for the particulars. Start with a full page color black. Add desired background, resizing it to show some of the black for a frame. I included the background I used below.


I used the fonts Rage and Circus for "Christmas"making them different sizes. I added a white shadow to each letter (go into "Inspector" click on shapes, click on shadow, change color as desired)
The other font I used is Harrington. The snowflakes are from the font "Flakey" and I used the opaque option in the inspector to fade them a little. I put black boxes around the pictures and the mid section.

Here are cards I made for the last two years...


Thanks for stopping by!!


Saturday, December 1, 2012

Advent Calendar Boxes


Can you believe it is December 1st already? Time to get out the advent calendars. I discovered  these awesome advent boxes a few years ago. I thought I would try a little different version of them this year.
The one pictured above I covered in cork. I used thick cork for the top and bottom (I found this at a dollar store) and thin cork to cover the match boxes. I glued some silver decorations that I got from a dollar store on, and used screw brads and black brads for the drawer pulls. I glued wooden beads to the bottom. This is a more masculine box that I am giving to my nephew.


I made this silhouette advent box for my niece. This is my favorite advent box yet. I cut the silhouettes from the "Child's Year" Cricut cartridge. I mod podged champagne glitter on black brads leaving the black to frame the brad. I painted the wood beads that I glued on the bottom - black. Before I glued the top on the box I glued a long piece of ribbon in between the layers, and then tied a bow on the top.
CLICK HERE for the tutorial I made a couple years ago. Some things I did different this time: 1)Instead of hot glue, I used mod podge to glue all the papers on. Next time I will try using mod podge to adhere the match boxes together. 2) I painted the cube with a background color to cover the matchbook colors. 


Thanks for stopping by!

Thursday, November 29, 2012

Large Christmas Countdown Blocks


Welcome to my blog! Here is another craft that was done at our Super Saturday. 
What I liked about these Christmas Countdown blocks is that they are large. The blocks are made from 4x4's and the base is made from a 2x6. All papers were cut slightly smaller than the blocks, and the edges were inked. The papers were mod podged on to the blocks, then the numbers, then a top layer of mod podge. It is important to wait twenty minutes between layers to prevent bubbling. The numbers were cut from a Cricut, and I used the cartridge "A Child's Year", size 3. 
Block 1 needs numbers 0, 1, 2, 3, 4, 5.  
Block 2 needs numbers 0, 1, 2, 6, 7, 8. 
The six works as a 9 as well. 
The Christmas Countdown label was laser photocopied onto ivory paper and mod podged on to the painted base. I used the font "Impervious".  


Thanks for stopping by!

Wednesday, November 28, 2012

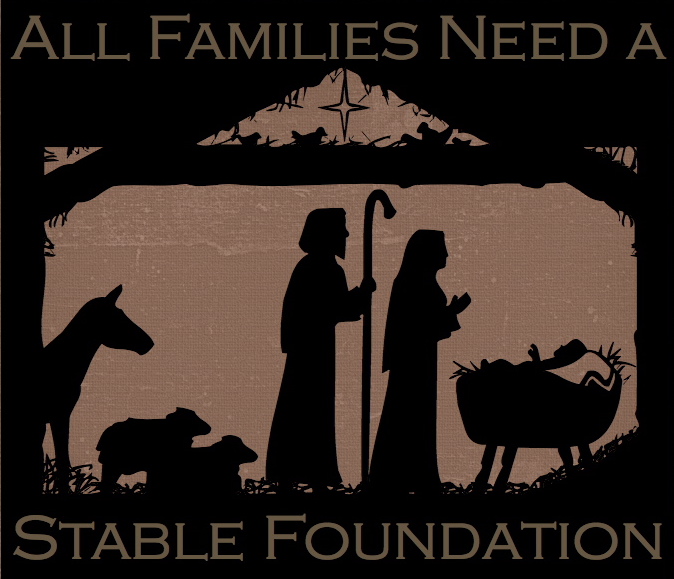
Stable Foundation Free Download


In my previous blog post, I showed a picture of a Christmas craft I made at a Super Saturday at my church. I had a lot of requests for the file. Unfortunately it is not my file to give. Although this is not as nice as my friend had made, I am posting this image as an option for a free download. I have also asked my daughter to draw one for me (she is an awesome artist) so I can make some more gifts. When she finishes this project, I will post that one. I promise it will be awesome!!
Right click on image, open image in new window. Copy and paste to desired publishing program. Resize as desired, print. 

Thanks for stopping by!

Linking up to...

Tuesday, November 6, 2012

All Families Need a Stable Foundation


Hello! With the first week of November slipping away quickly I thought I would do my first Christmas post. I was helping to organize a Christmas craft day for the women's group at my church and this was one of my favorite projects. My friend made this image with her Creative Memories program, printed them off at Staples, and the only thing that needed to be done was paint  pre-cut plywood, and Mod Podge the picture on. The picture is 8x8. I loved this saying and my friend did a wonderful job at putting this project together. 

Thanks for stopping by!

Linking up to....