Thursday, August 30, 2018

Creating a Photo Wall on a Budget - and How to Determine the Layout


Hello! Welcome to my blog! This project has been on my mind for years - and this summer I found some time to do it. Some reasons it was hard to get started: 1. Out of the tons of pictures I have, which ones should I use? 2. What should the layout be?
3. What frames should I buy?

This photo wall cost me less than $12. It is not that I did not have money to spend, just why spend more money I you have to? I moved into my house ten years ago and never unpacked my framed pictures. I decided I would use the frames I had and use them. The twelve dollars was the fonts (purchased at garage sales) a mirror from the second hand store (which is the frame around the F)  the large frame and the square frame. All were purchased not really knowing I would be using it for this wall - I just liked the items so I bought them. The one I intentionally bought for this wall was a plate frame that cost $2 at a second hand store - I painted it to match.


 Now for my questions that seemed to put this project on hold for so long:
1. What pictures do I use? - do I put grandma on the wall? What about Aunt Jane? I don't want to leave anyone out right? I decided it would be a photo wall of our immediate family. 
2. What should the layout be? - I looked and looked on Pinterest. I had a ton of ideas pinned. I finally decided that the layout would be determined from the frames that I had. 

Laying things out on the floor, I started with the biggest frame I had, having no idea what picture would be inside it. I added other frames that kind of made a nice centre arrangement. Then I thought I could do a collage on either side of the centre arrangement - still not really knowing what pictures would go in the frames. Then the ideas of pictures started to come. My ideas were "We have two girls - their grad photos could go in the centre of the two collages and pictures of their lives surrounding that (baby, family, their dogs, their children) and a family picture in the centre."

3. What frames should I buy? - I really only needed to buy one more frame to match the other side of the collage. I had a ton of frames so I did not need to buy more. They were all mis-matchy though so I went to work painting them. (I will post about the frame painting soon). Then another dilemma came up - what colour do I paint them?
It might sound crazy - but I chose my colours from the amount of paint I had. I had a lot of olive green, and light beige. Of course I had those paints because they matched the style and decor of my house. I had purchased the paint from Michael's when they were on sale for $1. I mixed a bit of plaster of paris in the paint so it would stick to the frames as some of them were cheap dollar store frames. Adding plaster of paris in acrylic paint makes it a chalk paint. Then another dilemma I had was  - what frames should be green?what frames should be beige? I decided the 5x7 frames from the collage would be green and two frames from the centre piece (since I had more of that paint) and the 4x6 frames from the collage and one from the centre piece would be beige. The big frame would remain black to tie in the letters and the round frames I would paint black. I love how the frames turned out:


With the "family" frame I mod podged burlap on poster board to make it stiff. I hot glued the letters on. The glass is still in the frame I just put it behind the burlap, just in case I want to change this up one day. I purchased these letters at a garage sale for $1 a while back. I wasn't sure what I was going to do with them - but they just happened to fit perfectly into this frame and so on the photo well they went.

 I loved this tip before putting the pictures up. I traced all the frames on to paper and did a mock set up on the wall. This was extremely helpful. I rearranged the pictures after I took this picture. I noticed the collages were further away than I wanted them to be from the centrepiece. 

It feels so good to have this completed. The awesome thing was my husband was excited to help me hang this up because it looked so good! Usually he cringes when it comes to putting a nail in our walls. He is going to build me a console table to go under this so stay tuned!

Thanks for stopping by!

Tuesday, August 28, 2018

DIY Ranch Sign


Hello! Welcome to my blog! A couple of summers ago I made a ranch sign for my mom. Instead of painting the information on it I wood burned it. I only have a little wood burner so the wood burning took quite a while to do (the sign is about 4'x5'). The sign just went up this spring so I was able to get a picture of it where it was intended to hang.


I was happy how the sign turned out. I burned out some of the plywood along the edges to give the worn look. I also burned the wood with a torch.
On a smaller piece of plywood I wood burned a scenery that my daughter drew for me (she is the artist, not me). I wanted to do it on a separate piece of wood just in case I messed up.


After I wood burned I put on three coats of clear Varathane. In hind sight I would have chosen a lightly stained Varathane to give the wood a more aged look. 

It will be interesting to see how this weathers. I wood burned a little sign for my aunt and the burnt part of the wood came off leaving just an impression of the font, and basically you can't read the sign. She painted black paint over the font so we can see what it says now. I did not put Varathane on her signs. I will have to do a post in a couple of years showing how the ranch sign weathers.

Thanks for stopping by!


Monday, August 27, 2018

Wooden Tree


Hello! Welcome to my blog! Just a super quick post today. Last year I suggested to my husband that he make things for me as possible ideas for birthday / Christmas presents. I showed him some of my PINS and he made three wood items! What a score!! This is post #3 of the three items he made. I had seen on Pinterest wooden Christmas trees with shelves and hangers that knick knacks can go on, and just loved that idea. Although I wanted that tree idea but in a house shape, my hubby made me the tree. I loved it! Post #2 of the three gifts explains the whole story. Click here to know more and see the other gift.

Thanks for stopping by!

Thursday, August 23, 2018

House Shape Wood Mini Wall Unit


Hello! Welcome to my blog! Last year I suggested to my husband that he make things for me as possible ideas for birthday / Christmas presents. I showed him some of my PINS and he made three wood items! What a score. This is post #2 of the three items he made.I had seen on Pinterest wooden Christmas trees with shelves and hangers that knick knacks can go on, and just loved that idea - but I wanted it up all year. I explained to him that I wanted the wooden tree idea - but in a house shape. He misunderstood and made me the tree. I will be posting about that next. He asked if the tree is what I was talking about. I hesitantly explained it too him, because I loved the tree and didn't want to seem ungrateful. He said he wanted to make me the house and he worked on it with lots of input from me.
He did not buy any wood. He used up wood that was laying around. He was excited to use some rustic wood scraps for the shelves.

Once the house was all put together I had to figure out the hangers and the decor. I plan to switch up the knick knacks depending on the seasons.


I found the words at Michael's and gave them a white wash paint. I love how the "y" in family hangs off the shelf. I made the house with scraps. I didn't even have to cut them - they were in our garbage. The bottom of the house is a wood block that I used to test colours for my wood sign (which was gift #1 click here to see it) - so it matches the sign I painted.
I am so happy how this turned out - and I get lots of comments on it. It is hanging at our entrance.


Thanks for stopping by!


Wednesday, August 22, 2018

Bless This House - DIY Wood Sign


Hello! Welcome to my blog! Last year I had the brilliant idea of asking my husband to make things for me as possibilities for birthday / Christmas presents. I showed him some of my PINS and he made three wood items! What a score. The first one I am blogging about is the wood sign. He made the sign out of scrap wood that was laying around our place. It was given to me as a blank slate, and I decorated it. 


I love the farmhouse style decor. I purchased the chickens from Hobby Lobby. It is one of my "must go to" stops when we are in the United States. 

I don't own a Silhouette, and I didn't like any of the font cartridges I had on my Circuit - so I made my own stencil with card stock. When I was painting somehow the stencil slipped while painting "this" so it is a little crooked. It bothers me something awful, but I will live with it until I redesign the sign. 

I love my birthday present! 

Thanks for stopping by!

Tuesday, August 14, 2018

Dead Horse State Park - A Short Side Trip On the Way to Moab

On the way to Moab from Salt Lake we took a little side trip to Dead Horse State Park. 
The drive on highway 313 was very scenic. This is the highway that takes you to the Island in the Sky Viewpoint. We arrived in the heat of the day - around noon - on a scorching hot July 1. 

I had done a lot of studying. I thought I knew how much the entrance fee was going to be as the State Park website I had read a few days prior said $15. It also said there was a Senior admittance rate of $10. The lady at the entrance asked for twenty dollars. I was confused. We asked for the Seniors rate and she said they had done away with the Senior discount. I asked about the $15 entry fee - and she said it had recently changed but the website at that time did not. What is a person to do? They have now changed the information on the website. They still have a $5 discount for seniors but you need to be a Utah resident (which it did not indicate before). We paid the entrance fee but it was a little frustrating not having the correct information. 

We hiked half the flat West Rim trail. We wanted to walk from the Visitor Center to the overlook but it was way too hot. We walked back to the car and drove to the overlook. We were glad we drove to the overlook. It was lunch time and we decided to have a picnic. There are fantastic picnic areas with the most incredible views. 
Lots of picnic tables to choose from. The view was just twenty feet away. 
I was chicken to go too close to the edge of the rocks.
 It is very high up. 
 This picture doesn't really show how high up we are until you see how tiny the cars are on the road below.

I loved the overlook that had rails and a beautiful rock wall. The path near the visitor centre is pretty neat too. The bathrooms were nice and clean, but very HOT on a toasty July afternoon. It is about a half hour drive from here to Arches National Park and about a thirty five minute drive to the Hotel we stayed at.


Was it worth the side trip?
We spent just a little over an hour here as our main destination was Moab and Arches National Park. Even though it cost an extra $20 (which meant we spent $100 American - $140 Canadian coin on going to parks) that is what we drove all this way to do. Moab is a 20 hour drive from my house in Canada. We did not come all this way to cheap out and not see these amazing sights. It gave us a little glimpse of the Canyonlands which we were not able to spend much time in. I can’t say I would come back to that particular park - (I would probably carry on to Island in the Sky which Google maps says is 18 minutes away from Dead Horse State Park) but it was neat to see the Colorado River at this Point.  

I am sure there is much more to explore here and the campground with rustic yurts looked interesting. What a view!


Wednesday, August 1, 2018

A Greenies Experience at the Narrows - Zion National Park


I loved the thought of hiking the narrows. I read lots of posts about the hike. I did some preparation
to make this hike the best experience I could. 

When doing my investigating into this hike I wanted to know:

How much time do I need?
*answers are based on my experience and different circumstances could change the outcomes*
I studied this out and the information I got was very accurate! I planned on 6 hours and did it in 5 1/2. Here is a breakdown. 

Riverside walk ends 1 mile 0.5hr

Mystery Falls 1.4 mile 1hr

Start of Wall Street 2.4 mile 1:50hr

Orderville Canyon 2.5 miles 2hr

End of Wall Street 3.5 miles 2:30hr

Hardest part… deep 4.5 miles 3:30hr

Big Springs 5.0 miles 4hr

We turned around at the end of Wall Street - or at least what I determined to be the end of Wall Street - there are no signs. We left our hotel a little after 6:30AM - and got back to the hotel at 1:00PM.

What time of day should I go?
From my studies - a lot of people suggested to go early to beat the crowds. We decided the day before the hike that we would drive and park at the museum (shuttle stop 2 in the park). We liked the parking there as there were parallel parking options which should mean less door dings. We ended up leaving our hotel a little later then planned because we wanted to eat the continental breakfast which wasn’t served until 6AM. We drove to the park a little after 6:30 - the first shuttle in Springdale would have picked us up at around 7:15, but shuttles in the park start at 6AM. There were about half a dozen others waiting at this shuttle stop. When the shuttle came to pick us up - it was full. We managed to squeeze in and I was standing beside the bus driver. It was a good view out the front window - I just had to hold on for my life. The driver was nice and carefull. I wasn’t sure if we were going so slow because the driver wanted to be cautious or if we were so weighed down the shuttle could not go any faster. We were packed in there like sardines! The other stops had people waiting - but could not get on as the people on the shuttle were getting off at stop 6 (Angel’s Landing) or stop 9 (The Narrows). It was busy even early in the morning. There was a line up for the bathrooms at the shuttle stop. It helped being at the front of the shuttle as I got to the bathrooms at the head of the pack. Once we started on the river walk the crowd thinned out as some people were still at the bathrooms - while others did not stop there. On the hike back it was nuts. It was July 4, so I was expecting it to be busy. We managed our way through the crowds that were in the river and on the river trail. The shuttle bus was not as busy coming back. 
Leaving early was good - but don't expect it not to be packed already. 


What should I bring with me?

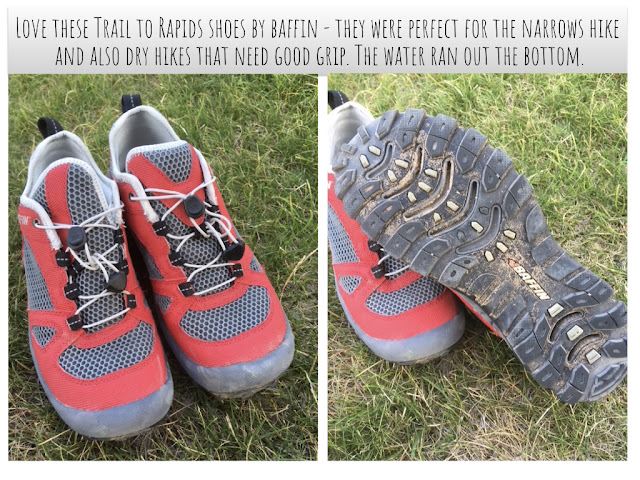
  • I took a backpack with water, a snack, the park map, sunscreen, and a camera. I purchased special shoes that were awesome. They are Baffin trail to rapid shoes. We wore wool socks with them to help prevent chaffing. My husband made walking sticks out of old hockey sticks. We got some compliments on how creative we were. We thanked them and explained we were from Canada eh! We did consider renting the supplies needed - but we were wanting to get on the trail before the rental place was open and were too cheap to pay for two days. The shoes we purchased will be handy as we are active hikers. 
 Do I need to prepare anything?
  • I seen a lot of rented gear being used. I also seen too many people so unprepared it was scary. My eyes bugged out when I seen a lady hiking through the river with a newborn. There was an older gentlemen with no stick trying to navigate a fairly easy part of the river and he almost fell in. I almost fell in a few times with a stick. I seen some people with two sticks. I am not sure if that is better as I needed my other arm to help keep my balance. I read a trick the was helpful -  to keep two points of stability on the ground at all times. When one leg is taking a step - your stick and your other leg should be on the ground. 
  • I wore layers - I had to take off my pants as I could not sinch them up any further. I had shorts on underneath. In some areas the water came up to the bottom of my shorts. I was told by someone who spoke to a Ranger that the water level was lower than it had been other years at the beginning of July. We didn’t even get to the deep part. I had my bathing suit on underneath just in case but it did not come to that.
  • It was like Christmas going to the Narrows. Every step and every turn I took was like a gift of amazing beauty. There is no way to adequately describe what you will see. You will be blown away.

  • There are some things I wish I did:
    • take more pictures: I did not want to be constantly looking at the scenery through the lens of a camera, on the other hand, I wish I did take more pictures, or at least video of my husband and I striving to navigate through the river. I think that would have been a great video to have.
    closest picture of my husband trekking through the water. A close up would have been good.


      • I wish I knew where I was in the Canyon. There are no trail markers. I knew this before hand but I thought from all my studying that I would be able to remember where I was. The only thing I did remember was the Orderville Canyon. There were some people confused when we got to this point. I was able to tell them which one was the main canyon - and that the other one was a side canyon they could explore. I suggested if they were here for the popular attractions - take the main canyon, if they had to choose between the two. I have since found a map - CLICK HERE - which I suggest to take a screen shot of so you have it handy on your camera if you need to reference it. 


    What an awesome hike! Go prepared and have fun!

Saturday, July 21, 2018

Zion National Park - Scout Lookout Hike


Zion was awesome! Here is one of the trails we hiked that contributed to the awesomeness - Scout Lookout

The thought of hiking Angel’s Landing gave me great anxiety. I watched some videos that 
freaked me out - so yeah, doing Angel’s Landing was not an option. One video I watched showed just walking up to Scout Lookout and then deciding if you want to carry on! I was 
excited about that suggestion and made this the plan! 

When doing my investigating into this hike I wanted to know:

How much time do I need?
*answers are based on my experience and different circumstances could change the outcomes*
  • From the shuttle stop, up to the top, back to the same shuttle stop it took 2 hours. We did not rush. We took quite a few pictures. We had a snack at the top. We enjoyed the view for a while and watched some hikers go up Angel’s Landing. Add 30 minutes each way if calculating time from the hotel room and taking the shuttle. There was a group of young men who ended up running down the trail. It freaked me out a bit. The trail is wide enough for people going up and down, however it is still high, and carved into the side of the mountain. I would not want to be running as there is some dirt on the paved trail, and it is a steep grade - which makes it slippery.
   Take your time and enjoy the view. One of the young men mentioned they were in a hurry as they wanted    to do the narrows before dark. I don’t think they would have had enough time. It is tempting to cram a lot in a day - but if you can - take it easy - and be safe. 

What time of day should I go?
-  I was originally planning a morning hike, but I was excited to get into the park and do something. A huge concern for me was the heat and the crowds. We left our room about 5PM and were at the Grotto stop by 5:30. The shuttle in the park at this time had plenty of room. There were no line ups for the bathroom at the Grotto Stop. There was hardly anyone on the trail. It was smoking hot that day - 100 degrees. Going at this time was not a problem. The sun was behind the mountain and we were in the shade. 


What should I bring with me?
  • I took a backpack with water, a snack, the park map, sunscreen, a flashlight and a camera. I wore hiking shoes with good traction. I didn’t need the flashlight or sunscreen. I was glad to have the other items. I do wish I would have had a selfie stick.
Do I need to prepare anything?
  • Although there were few people on the trail, there were a couple I had to shake my head at. The footwear was not appropriate. Flip flops or other sandal like shoes with no support would make for a painful hike. I was glad to have awesome traction as going up the trail and down the trail made it more enjoyable. Who needs blisters?
I loved this hike and definitely recommend it for adults and older children that are carefully looked after.

Zion National Park Adventures


Hello! Welcome to my blog! I usually only post crafty things - but the last six months involved creating an itinerary for a fantastic vacation. I found so many helpful posts that helped me prepare for this trip. I love asking people about places they have visited. I didn’t want to leave things to chance, especially as we would be driving 6000 kilometres (about 3700 miles). Reading about others’ adventures helped familiarize me with the area and I could make decisions based on my style and preferences. Here are my two cents that will hopefully in some way help someone else create their awesome vacation.
We zipped through four national parks on our 2018 summer trip. Zion National Park was our last destination, and what a finale! I was absolutely amazed. This is a place where the pictures you see do not do any justice - it has to be seen in person to truly see its beauty. Lots of time was put into preparing for this trip. I had a plan - some things worked, some things didn’t. A couple reasons some plans didn’t work out:
  1. I overplanned for the time we had. Doing everything I wanted to do would have made for too hectic of an experience. I was okay to go with the flow and be flexible. 
  2. I did not know everything, even through all my studying. 

The purpose of this post is to give my experience so that others can be a little more prepared from what I learned going to Zion National Park. 

We entered through the east entrance. We stopped at a pull out right away because we were so taken by the scenery of the Checkerboard Mesa and the cool color of the pavement.  We got back on the road heading to the Mt. Carmel tunnel. I am sure other tourists were blown away by the scenery as cars and motorhomes were stopping all over the place. There was a huge rock that a lot of people were at to take pictures. A motorhome stopped on the road - some people got out including the driver - heading towards the rock scene with camera in hand. Stopping on the road is not advised but I honestly didn’t blame them - I wanted to do the same - but didn’t want to tick people off.
Plan A was to stop at the Canyon Overlook Trail. It did not happen. The parking area on the side we were on was overloaded and when we got to the actual parking area for the trail head (which had space)- we could not turn. We said we would come back later but it just didn’t happen. I am not sure if this is only in the summer months, but there was a sign that looked pretty permanent that said no left hand turns. If you are coming from the east, just hope you luck out at the pull off just before the tunnel. There is a pedestrian cross walk to get to the parking lot for the trail head if you happen to get so lucky. If not - you can plan to come back, but we didn’t as there were other amazing things to see. It will be on my “to-do” list when I return here.

It took three minutes to drive through the tunnel. It was neat! The part that was amazing was coming out and having the mountain scenery greet us!! Driving down the windy mountain side into the town of Springdale was incredible. 


The side of the road was packed with vehicles and tourists taking it all in. I would have love to have pulled over to get pictures - there just wasn't room. What a view looking up to the mountain we just drove through.We did notice on the corners of the road lots of rubber marks bumping the curb. It would be extremely tricky driving a motorhome on this road.

We booked a room at the Holiday Inn Express. We found this to be a great spot! It was close to Shuttle stop number 6. We caught the shuttle twice from here in the afternoon and early evening and it was full after stop number 4. We had to refuse people that were wanting on. The good thing was that the shuttles were every 15 minutes; however, it would be interesting to know if that is a problem at the stops closer to the park entrance. If one stayed closer to the entrance though, it would be easy enough to walk there.  The shuttle ride with all the stops took less than 10 minutes to the park (not including the wait for the shuttle).

We stayed two nights in Zion and did the two bucket list hikes I was planning - Scout Lookout and the Narrows. Learn more about these hikes by clicking on the pictures.


I had other hikes in mind if there was time, but was happy with what we did!

What did I learn?:

1. Two nights is not enough. There is sooo much to do and sooo much to see. Everything is spectacular here. The good thing with
only staying two nights is that I have a lot to do the next time I am here.

2. Come prepared. I seen so many unprepared people. I couldn't believe the flip flops I seen on the trails. That would be so uncomfortable. It is also good to come prepared with a reasonable plan. We came across a group of young men running to get to another trail because they were short on time. Thank goodness the trail we were on was not busy - or that could have been very dangerous.

3. Is it a family vacation spot? Although it was just my husband and I traveling together - we did observe toddlers that were absolutely miserable. It is hot. It is busy. They are not taking in any of the beauty - and I think because the kids might be cranky - parents would not be able to enjoy the beauty of it. I did see children about eight and up having the time of their life walking in the river at the narrows (although I don't know how far they got). There are trails that are dangerous, and those that are not as strenuous to adults might be for not as tall and not as strong children.

Am I going back? You bet! I love Zion National Park!

Friday, July 20, 2018

Utah Road Trip - What I Learned, What I Would Change

 I just got back from the most amazing holiday in my life. I have not traveled much in the world, but I am starting to explore the continent I live on. I have been to Oregon and loved the three highway 101 trips we have done.  We have gone to Avenue of the Giants in California. We have been to Olympic National Park. Of course these were wonderful amazing trips filled with beauty and the awe of nature. I have to say, I was blown away by our trip to Utah. I live in beautiful British Columbia Canada. We had a week to do our trip. I would have loved to have been able to spend more time but the cost of the trip was pricey with having to pay 1.36 exchange - OUCH! The studying about the area and the planning began months and months in advance. It was hard to choose where to go, I wanted to see it all, but I knew that time was limited. I searched Pinterest, Trip Advisor, and many blogs and websites. I am so grateful for all the information people have shared. If I didn’t do my homework this trip would not have been as good. 
Here is what I learned when I went to Utah along with some things I would change:


 Moab: (July 1)We drove from Salt Lake to Moab via highway 6W. This took about 4 1/2 hours. Most of the way was flat and desolate. We did not find this very scenic, but it was the fastest route.
We took a little detour to Dead Horse State Park. The drive on highway 313 was very scenic. This is the highway that takes you to Island in the Sky Viewpoint. We only went as far as the State Park. I will do a post on that in the future. We only had one night in Moab. I wish I had time to do at least two nights. We stayed at the Fairfield Inn and Suites. It was awesome but pricey. It was our favorite hotel of the trip, but then again it should be as we paid the most for it. We relaxed at the pool for a while. The pool area was the nicest I have seen at a hotel. It was July 1 and scorching hot. Around 6:00 we drove to Arches (very handy - 3 minutes away). We drove right in - no line up. The drive at the beginning was fantastic! The big cliffs, driving up the mountain road was incredible. We drove to a lot of the sites that were easy to get to. Doing hikes in that kind of heat was not my favorite so we opted for the easy short ones - the double arch/windows, and balancing rock. A lot of formations are easy to see from the road - however the one I wanted to see was Delicate Arch which I researched was a 2 hour hike to get to. We planned on doing this hike in the morning - but we did not get to it. My hubby was not feeling well (could have had something to do with the heat) so we left Moab without seeing it.  

overall opinion of Arches - of course Arches is beautiful, and I didn’t see everything to give a fair opinion - however - with the pictures I had seen of the park online - I was not surprised when I visited, other than the first drive into the park which was really cool. I would definitely change the time I spent - at least two nights is needed. There are lots of bike trails that looked really interesting. Although I am a dirt biker, I would opt for the mountain bike rides as there was a cool paved path for them. I seen an ATV tour depart and it looked super dusty having to follow a pack of ATV's like that. 
 Capital Reef: (July 2) We drove from Moab to Bryce Canyon. Although we did not intentionally stop to visit Capital Reef National Park, we drove Highway 24 which drives through some of it. We actually thought we were on the Scenic Byway 12 - the drive was so beautiful. We were thinking, how could highway 12 be more beautiful than this! We stopped for a break at the Hickman Bridge Trail which is right off the highway. This was about 2 1/4 hours from Moab. It was 11 AM, and boy was it HOT! We made it to the bridge in 1/2 an hour - taking a few picture and water breaks. We rested under the bridge for quite a while as it was shady and relief from the sun. The restrooms here were nice and clean. A little further after Hickman Bridge, we stopped to look at some Petroglyphs. It was really neat to see orchards along this highway too.


overall opinion of Capital Reef - I would love to come back and explore more! There was a pullout along the highway just before the Hickman Bridge trail pullout called The Grand Wash. My hubby was excited to see Factory Butte along the way too (natures dirt bike area).
 Bryce: (July 2) We arrived in Bryce around 3:00. (Left hotel in Moab around 8:30ish). We took our time driving as Highway 24 and 12 are amazing! We stopped for one hike and stopped at quite a few lookouts. Hogsback is an interesting part of the highway that freaked me out. It felt like Angel’s Landing for my car. We stayed at Best Western Ruby’s Inn. I was amazed at the size of this “Inn”, and was impressed how organized the check-in and check-out was. It was very touristy, but that made it neat too. We didn’t want to go to the National Park until around 7:00 so it would be cooler. We went to Sunrise Point. I had read all sorts of opinions about how to do the Queen’s/Navajo trail loops. At one point I was thinking to start from Sunset to Sunrise, but later decided to do Sunrise to Sunset as the park suggests. I liked this route. Going up the switchbacks to Sunset Point was an amazing finale to the hike. At 7:00 we were in the shade, although it was sunny out. We looked down into the ampitheatre, and my hubby said - “that’s nice - but I’m not going down there.” I said, “oh yes you are!!!” He was glad that I convinced him. Words cannot adequately describe this trail. Pictures cannot adequately capture its beauty. We started the hike from Sunrise Point at 7:15 and ended at Sunset Point at 8:30. We were taking it easy with lots of stopping to take it all in. I was worried about the trail being too hard. I am not exactly a spring chicken. I heard the elevations make it even more tough. When I told my daughter about the trail we were going to hike she said- good luck with that - I am guessing she was insinuating that I was not fit enough. The switchbacks going up the Sunset Point are a little steep, BUT, I do trails in British Columbia that are harder than this. I found it rather easy. Being in the shade and the cooler part of the day probably helped. We stuck around for the sunset and also stayed until really dark to see the stars in the night sky. 

overall opinion of Bryce - I was blown away. I sort of knew what to expect from the pictures, but being there in person is another thing. Every step we took, we were amazed. What to change? There were some great looking paved mountain bike trails that looked attractive to me as I am very strong in my pedalling stamina. Would stay at least two nights to get more hikes in. The rim trail from Sunset Point to Bryce Point would have been nice to walk. I was glad to visit in the evening when it was cooler.
Zion: (July 3/4) We arrived in Zion around 11 AM, which took just under 2 hours from Bryce. With this stretch of the highway we drove through Red Canyon which has two arches you drive through. When we got to Zion National Park, the entrance took my breath away. Never have I seen such amazing beauty. As we drove further, the scenery did not stop. How many times can a person say “wow!” I bet that word has been said more here than anywhere else, surely out of my mouth anyway. Driving through the Mt. Carmel tunnel, then winding down that mountain is a drive I will never forget. For more information about Zion click HERE.


overall opinion of Zion - Never have I seen such amazing beauty. Evening hikes or first thing in the morning a must. Even taking the 6:30 shuttle it was overfull by the second stop.

My first thought when I got back home was - when can I go back? I want to do some more exploring before I am not physically able to. What a great place to go!

Next summers destination - Yosemite!!