Wednesday, April 20, 2011

Easter Favor - Carrot Box Tutorial


My friend shared with me a project she made from Stampin Up. It was a cute little carrot box. I loved it...


Then thought I would give this box another try with a little different look. I found some orange-ish paper in my stash. I printed out the carrot box template that I found at THIS LINK. My carrots are not as big - I printed two on one 8 1/2 x 11 page.


I had some butterfly orange - ish paper and I also had some orange paper that I stamped some flourishes on. I forgot to take pictures of that - oops. Remember my shamrock? I stamped the cut out carrot like that using a brown and a red. After stamping I scored the lines, folded and hot glued the carrot together.

Here is the carrot I stamped flourished with. 


Here is the butterfly paper one. I inked the edges of both with brown ink.


I changed up the top by cutting off one of the flaps - gluing it to the other and folding it down because I wanted the box to be easily accessible. I also punched a hold and inserted some raffia....


and then I tied a knot in the raffia and hot glued that knot secure.


So there is my spin on the Stampin' Up Carrot Box.

Monday, April 18, 2011

Treat Bag Made From an Envelope


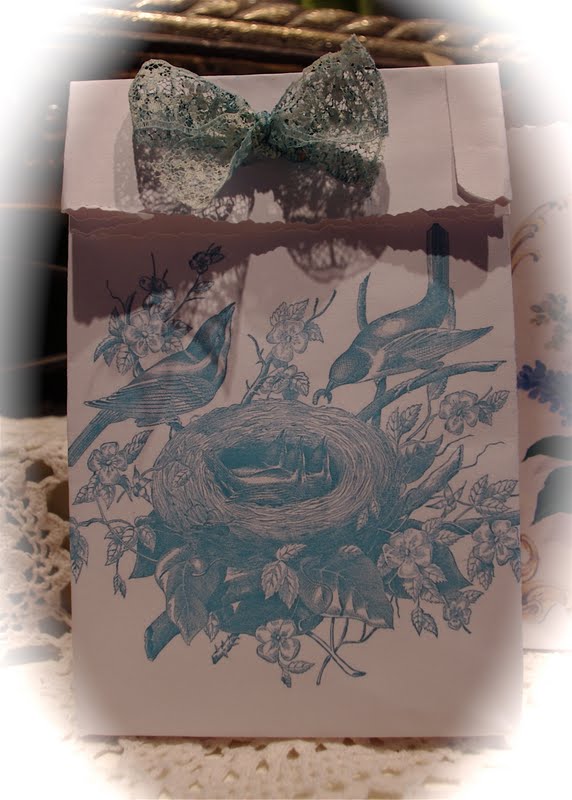
Here are some treat bags I made for Easter, that are made from an envelope. I went to a Stampin' Up party and this was one of the crafts they did. I did end up buying the stamp roller that they used with this particular craft, but I thought I would do a "try"al for an Easter craft. So here are the instructions on how I made an envelope treat bag with a computer graphic printed on it. 


Seal a 5 3/4" x 8 3/4" size envelope. Cut the envelope to fit your printer to and 8 1/2" instead of 8 3/4".
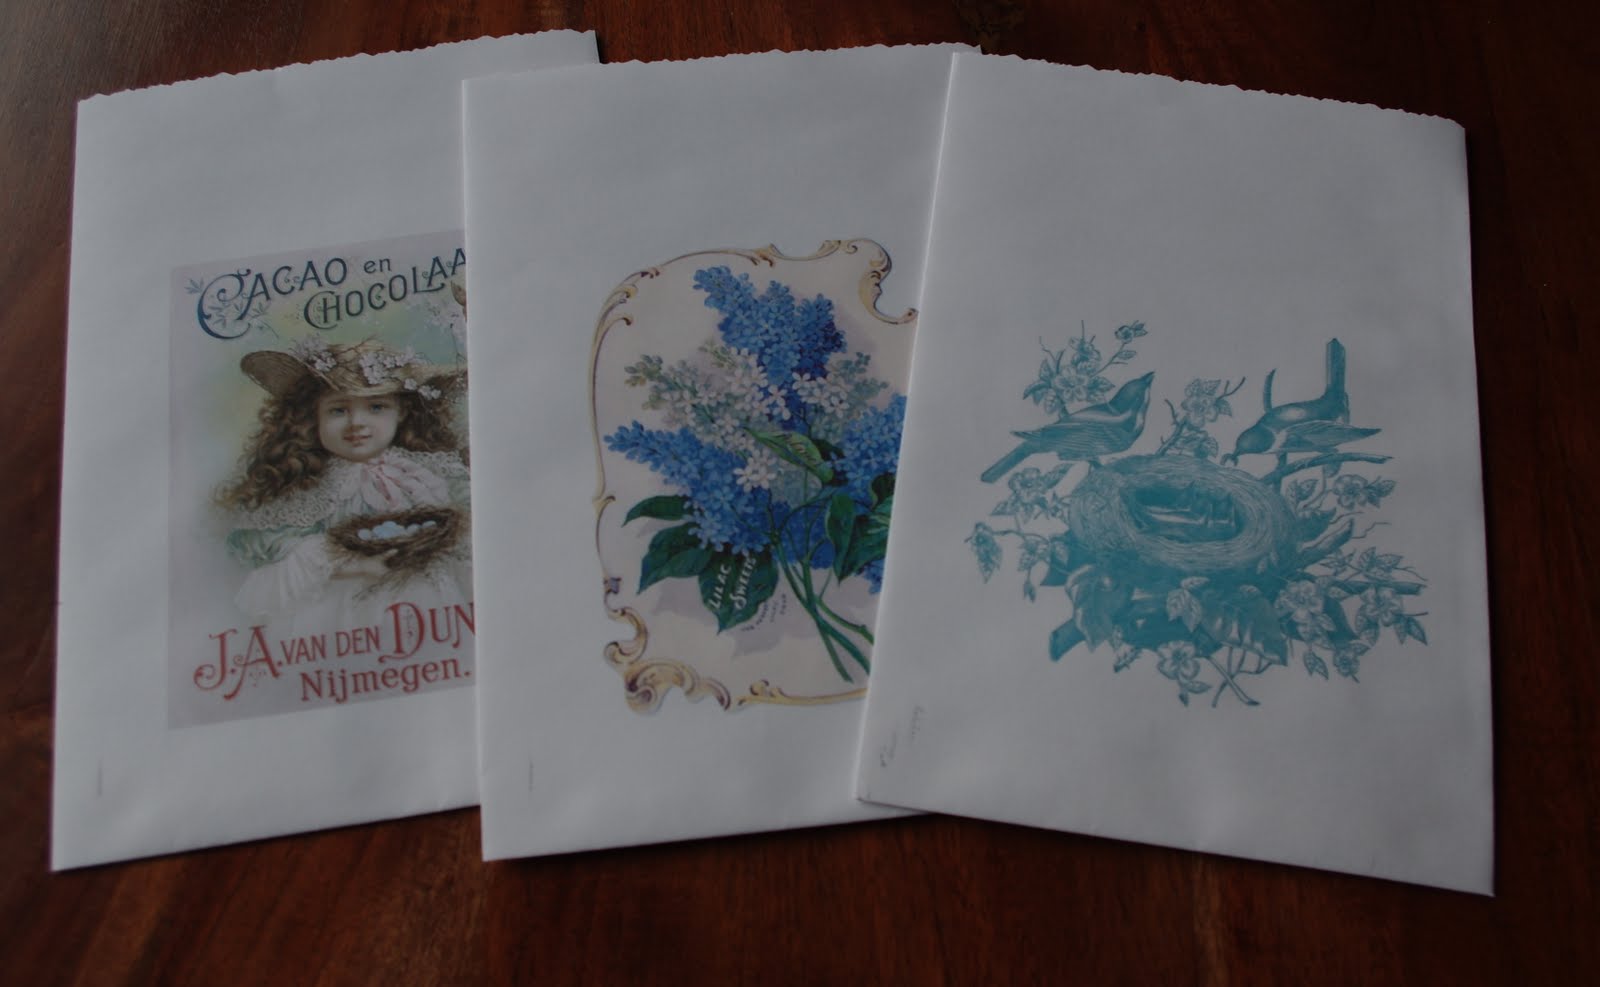
Find the desired clip art and size it on your computer. I got my clip art from the Graphics Fairy blog. There are a ton of wonderful graphics on there and she even has some crafts ideas you can make with the graphics.


Test the graphic on a piece of scrap paper by drawing the shape of the envelope on the paper to see if you have it square and the right size. The graphic needs to be about 1 1/2" away from the sides of the envelope. If you use a graphic that is rectangle, you can use the straight lines for folding lines. If this is the case, the graphic needs to be 1 inch away from the sides. 


Print the graphic on to the envelope. *The envelope should fit the width of the paper slot. Do not put it to the side - I learned the hard way - paper jam.* 
Also make sure the opening jives with the way you want your graphic. I forgot about checking that but got lucky and didn't have any upside down graphics.


Fold the two sides over, about an inch. Open up the sides and fold up the bottom, the same measurement. Press the folds to make a good crease.


Stick your hand inside the bag.  Work at getting all the creases into a nice square fold. Each fold now needs to be turned the opposite way- the fold lines are there as a guide. Again crease the folds to make them crisp.


Get the bottom flat and work the envelope until you get two triangles sticking out each end- you will glue the triangles down soon. 


The sides have three creases - push the middle crease towards the center (or inside) of the bag. 


 Once the bag is all square and the creases are crisp, fold triangles to the bottom of bag and glue.


 Finish the bag to your liking.


Of course you don't have to print a graphic on the envelope - you can stamp it, add stickers, or how about some flowers? The possibilities are endless. 
Happy treat bag making!!

Friday, April 15, 2011

Chocolate Easter Egg Bowl Tutorial


This little chickie is sitting inside a homemade chocolate Easter egg bowl.
I looked up how to make a chocolate bowl on You Tube and found a really cute tutorial by Judie Byrd.
Click HERE to see it.
 I knew when I saw this that I wanted to make some egg shaped chocolate bowls for a neat family treat.  
Changing up what Judie Byrd did a bit, instead of a round bowl that she made I made an oval bowl to look like a chocolate egg. Here is what I did....


I got all my stuff ready.
- 5 small balloons blown up to desired size. I washed mine with a wet paper towel.
I played a little wrap song as I wiped the balloons to entertain my hubby.
- 1 cup dipping chocolate
- pastry brush
-cookie sheet covered with waxed paper
-scissors for popping balloon


After melting the chocolate (I melt it in the microwave for approx. 1 1/2 minutes. Do not over heat),
paint the bottom of the balloon generously with chocolate. I experimented painting the chocolate on in a couple different positions - the balloon upside down and right side up (like in picture) and the right side up worked best for me. Coat half the balloon with a thick layer of chocolate and place on waxed paper. Continue with the rest of balloons. I only did five at a time. I only needed three, but I made a few extra just in case something happened. This was my first time making these so I didn't know what to expect. Chocolate will harden within 10 minutes.


 The tutorial said to apply two coats of chocolate. This is what my egg shell looked like when I did a second  coat. The chocolate was nice and thick but I wasn't too crazy about the look of the shell. I found one generous coating of chocolate gave for the smoothest look.


"POP" the balloons. The first balloon I popped, I popped it in the middle - don't do that - the balloon pops too fast. Although my shell didn't break, I am thinking it would have if it was one of the balloons I didn't do a second coat with.  Pop the balloon by making a slit where you tied the balloon. That will help the balloon deflate slower. 


The balloons come out fairly easy.


 If you don't like how some of the eggs turned out you can break up the shell and reheat the chocolate and try again. The tutorial said that could be done - so I gave it a try and it worked!


Put some paper grass in your egg,  and some Easter goodies and you have a sweet little Easter treat! I am putting these at our place settings for our Easter theme dinner.
Thanks for stopping by!

Thursday, April 14, 2011

Felt Easter Bunny Treat Bag


I got this idea from a sweetheart of a lady a few years ago. It makes for a really cute treat bag and pretty easy to make if you have a sewing machine.


Look at the back of this bag - so cute!
So here is how you make it:


Take a piece of felt and fold it in half (pictured on left)
Cut out to look like picture on right. Cut out contrasting inner ear and nose. Machine stitch from bottom left of right ear, all the way around to bottom right of left ear leaving the space between the ears open.
Hot glue on inner ear pieces, nose and googlie eyes. Make sure the nose is a little more than half way down and that the eyes are close to it because the bag will be tied shut and needs space for the ribbon.


Here is a bag all stitched and the pieces glued on.


Fill the bag with goodies. Tie shut with ribbon.
There will be a little bit of fabric gathered in the front between the ears.
I just tuck that in to face the back - see pic below.


What a cutie!

Wednesday, April 13, 2011

Chocolate Oat Scotchies


I found this recipe in a Taste of Home magazine way back in 2001. This recipe is easy to make and definitely yummy. The original recipe calls for corn syrup instead of honey - but I like to use honey instead. If you like peanuts and chocolate - then you should give this recipe a try.

Here's the recipe:
Chocolate Oat Scotchies

2/3 cup butter or margarine       1 cup packed brown sugar
1/4 cup honey                            1/4 cup plus 2/3 cup chunky peanut butter, divided
1 tsp. vanilla                               4 cups quick cooking oats
1 cup chocolate chips                1/2 cup butterscotch chips
1 cup salted peanuts
In a saucepan over low heat, melt the butter; stir in brown sugar and honey until the sugar is dissolved. Stir in 1/4 cup peanut butter and vanilla until blended. Add the oats; mix well. Press into a greased 13x9 inch x 2 inch baking pan. Bake at 375 degrees for 12-15 minutes. Meanwhile, melt the chips and remaining peanut butter; stir in peanuts. Spread over crust. Refrigerate until cool; cut into bars.
*reduced-fat or generic brand peanut butter are not recommended for this recipe.

Here's the recipe card....

Linking up here....


Friday, April 8, 2011

Spring Mantel


 I am done my spring mantel (insert happy dance here). Making pretty much everything from scratch takes some time, but it is time well spent. One thing I DON"T like to do is spend money, and one thing I DO like to do is make stuff. I have been putting posts up as I complete my projects so I will walk you through all I made....


Here is my recycled spring sign. The only thing that cost me money on this project was the glue sticks, electricity to run the glue gun and 50 cents for the wooden scrolls. 
Click HERE for the tutorial.


Next is my bird nest with baking soda clay eggs. This cost peanuts. The nest is made out of shaved wood hair that I bought at a dollar store. I just took a clump, shaped it in a circle, flattened it out at the center, and glued a cardboard circle to the outside bottom to hold the shavings in place. I have seen better ways to make the nest on blog land, but this sufficed for me. After making two nests,  I barely made a dent in the bag of shavings so I have lots left over for other projects.
After the nests were made I glued in some home made robin eggs that I made from baking soda clay. I am all for custom making stuff to get the right size and also the right price. 
Click HERE to go the the tutorial for the baking soda clay eggs.


Then there is my darling little decoupage cardboard bunny, with the paper that inspired the colors for my mantel. 
Click HERE for the tutorial.


And then there is my Spring Color Topiary tree, made with crepe paper streamers,  using inks to custom color the streamers.
Click HERE for the tutorial. 
I originally had this topiary in a yellow basket - but I couldn't find two of them, so I covered empty peanut cans with burlap that I stamped.

I have had lots fun decorating my mantel on a dime.
Thanks for stopping by!
Linking up to 
UndertheTableandDreamingChocolate Drool and KissesTip Junkie handmade projects


lil luna link party button


Recycled "Spring" Sign Tutorial


I love my recycled "Spring" sign. I recycled wood, cardboard, nature, and went thrift store shopping.
I have seen all those moss letters around but I wasn't planning on making any. It is funny how projects change. I was going to paint "spring" on this sign but I decided otherwise. 
Let me show you how I made my sign from recycled materials...


I printed "spring" off my computer. I loved this font (Harrrington size 650) but quickly realized that the moss covers the cool curves. I ended up adjusting the font. A plain old bold font would work best. I put the spring print outs on cardboard and traced over the letters, pressing hard to make an imprint in the cardboard. I cut the letters out with an exacto knife.


I proceeded to glue moss on the letters. After looking around on blog land I was going to buy carpet moss. Then I went for a walk and discovered some moss under a tree. I decided to use that - why go to a store. I did have dried moss but the moss needs to be pretty fresh to work with. 
Working an inch or two at a time - hot glue the moss on the cardboard. This is messy so do what you need to do for the easiest cleanup. 


The moss is very forgiving. I squished it on the letter to make sure it got a good bond to the glue and then I fluffed it up again. 


Proceed little by little until your letter is filled. Continue will all letters. 


My board came from this door. It looks like this door is on an operating table. It did go through a major transformation and I am so excited about its new look - but that is for another post - when it is finished. 


I hot glued the letters on using the glue sparingly as I plan to change this board up once in a while.


I found these sweet little scrolls in a bag of goodies at a thrift store for 50 cents.


I glued them to each corner, popping them off the edge a bit.

I hot glued a crepe paper flower to dot the "i" - click HERE to go to that tutorial.


And there you have it - a sign that costs pretty much - nothing.
I love recycling!