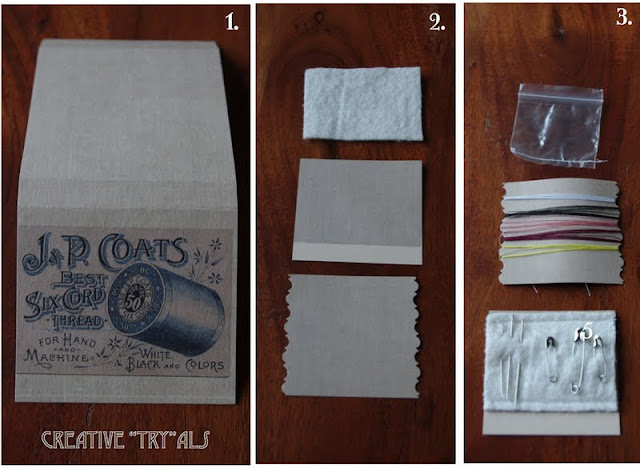
I needed a little sewing kit for a gift basket I was putting together and this is what I came up with. The vintage sewing clipart is from Graphics Fairy. I made my image 2 inches x 2 1/2 inches. I printed it out on cardstock and cut it at a 6 inch length and the width of the image (2 1/2 inches) - making sure there was 3/8 of an inch below the image to leave room for securing the matchbook closed.
1. Once your matchbook cardstock is cut out (6 inches long 2 1/2 inches wide with 3/8 below the image) you need to score lengthwise at 2 1/2 inches, 2 7/8 inches and 5 1/2 inches. Once folded you should be able to see the matchbook shape.
2. Cut out two pieces of cardstock 2 1/2 inches x 2 1/2 inches. Cut one of the pieces with decorative scissors for the thread card. Cut a piece of felt that is 1 7/8" height and 2 1/2" width.
3. Wind different colors of thread around the decorative cut cardstock, starting and finishing on the back to keep it neat on the front. Sew the felt on to the other cardstock. Add sewing pins and safety pins. Cut a mini zipper bag the height of the cardstock pages. Sew the bottom closed. This will be for buttons. Add the buttons to the bag after you staple the book together.
4. Place cards and empty button bag neatly on top of each other. Align and center the stack resting them on the bottom fold of the matchbook.
5. Making sure all the layers of the stack are against the bottom fold, staple the bottom flap - close to the bottom of the matchbook as you need room to secure the cover - and centered on the matchbook.
You can ink the cardstock if you like or leave it as is. Mine has been lightly inked.
And there you have it - a sweet little sewing kit.
Thanks for stopping by!
Linking to...


This is absolutely adorable....what a clever idea and of course, I love the GF image!
ReplyDeleteWhat a great idea! I love thoughtful homemade gifts. Thanks for sharing!
ReplyDeleteWhat a great idea! I'm over from the Tip Junkie Party.. http://runwithglitter.blogspot.com/
ReplyDeleteThis is totally brilliant! I love this cute idea and am anxious to make one myself! Thanks for sharing this!!
ReplyDeleteORIGINALLY CREATIVE...<3
ReplyDeleteSuch a great idea! Love it!!
ReplyDelete