Tuesday, May 17, 2011

How to Make a Live Ivy Topiary


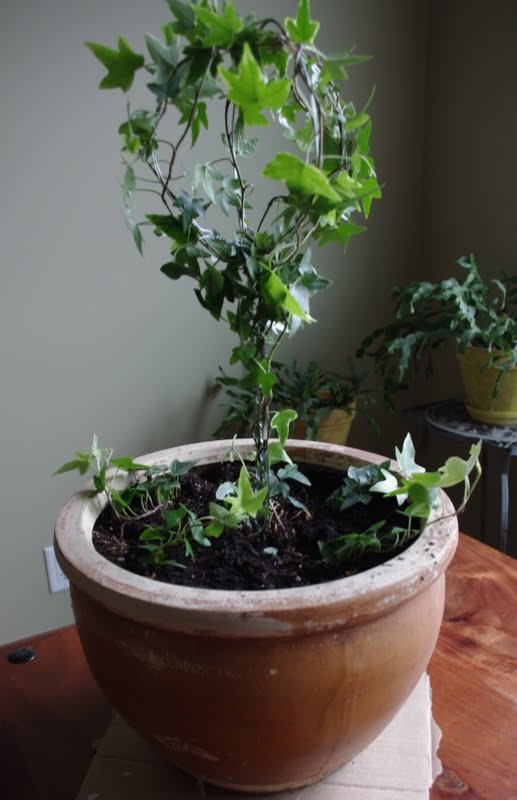
I have had this project on my "want to do list" for over a decade. It feels good to get this one off my list. I found this project in a book called "Creative Home Decorating". I do not have a green thumb - but I do try to have one. Making your own live topiaries has so many possibilities. Ivy topiaries I think would be the easiest - but I would also love to try making lavender and rosemary topiaries. One topiary down, two to go. Here are the instructions...

Plant ivy in desired pot. Make sure it is planted firmly. The ivy should have at least 2' long trails to begin creating a topiary form.


1. Make a wire form. Cut two 30" long pieces of galvanized wire or wire from a hanger. Make two lollipop shapes.

2. Join the two lollipop shapes by placing one inside the other to form a sphere. Twist the two stems together to secure. This can be reinforced by wrapping another piece of wire around the stems.

3. Place the topiary frame in the middle of the prepared pot. Working from the bottom to top, wind the ivy around the wire frame, covering as much of the wire as possible. The instructions from the book say to use galvanized wire pins to anchor the base firmly. I didn't have those - and I also found that my wire center was really flimsy, so I attached a steel skewer to the center. I am thinking next time I will use a wooden dowel when I make my lollipops.

I pinched off some of the ivy from the center stem and stuck them in the soil. I am not sure if they will take root and grow but I thought I might as well try it.


This is how the topiary looks at this point. The book has the following instructions for further care....

- keep the topiary in good shape by winding any new growth around the topiary form and pulling out dry leaves. 
- prune the plant regularly to maintain its unique shape. Pinch long shoots so the plant remains full and compact.
-with proper care, a beautiful ivy topiary can provide years of enjoyment.

Several different shapes can be made with the ivy. Try a star, a wreath, or even a spiral. There are so many creative possibilities!

Thanks for stopping by!
The Stories of A2Z
Tip Junkie handmade projects

Friday, May 13, 2011

Garden Planter Makeover


We bought a couple of large plastic planters a few years back at Costco. We bought them because they were a really good price for the size. A lot of other people had the same idea. These pots are all over the place. I never really liked the color. We bought two of them and one was darker than the other. The dark brown didn't really match our house either. These pots had two strikes against them - they were all over the place, and the color - blah. It never occurred to me before I entered the world of blog land that I could paint them. All the spray painting projects I have seen motivated me to do this planter makeover. 


Doesn't it look so much better? Here is what I did. After cleaning and sanding the pots, I spray painted them with two light coats of "Prairie Grass" plastic spray paint. When the paint was dry, I rubbed on some grey acrylic paint with a cloth. I wiped the pot with a slightly wet cloth to reveal bits of the green underneath. After the pot was dry I sanded it lightly with steel wool to scuff it up a bit.


I love the way these pots turned out. They don't look like Costco pots any more. They also go with the sagebrush wreath I made for my front door. 


Thanks for stopping by!


Fiesta Panini Recipe


I borrowed a Panini cookbook from the library that had over 200 panini recipes in it. This was the first recipe I tried from that book because I had all the ingredients - and boy is it good. I made this again yesterday - mmmmm. I doubled the recipe and was able to cook up three large tortillas and three small ones. You should give it a try....
Here's the recipe:

Fiesta Panini
1/4 cup drained rinsed canned beans
1/4 cup frozen corn kernels, thawed
1/4 cup sliced green bell pepper
1/4 cup cream cheese softened
1 tbsp salsa
2 - 6 inch flour tortillas
1 tbsp butter
4 slices bacon, diced and cooked crisp
1/2 c Montery Jack Cheese
In a bowl combine beans, corn and green pepper. Set aside. In another bowl, combine cream cheese and salsa. 
Brush one side of each tortilla with butter. Place on a work surface, butter side down, and spread with cream cheese mixture. Evenly layer with bean mixture, bacon and cheese on one half of the tortilla, leaving a 1/2 inch border around the edges. Fold tortillas over filling. Place sandwiches in a grill (panini grill, George Foreman, etc.) and cook until golden brown approx. 3-4 minutes. Let cool a couple minutes before eating.
Here's the recipe card....

Saturday, May 7, 2011

Touching Sentiment for a Mother's Day Card


I am always on the hunt for the perfect sentiment for cards. I am fairly good at being creative with the cards and putting a lot of thought and work into the making of them - but sentiments sometimes seem to be an after thought and then I end up writing something that I don't feel meets the standard of the card. Let's face it - the sentiment is a big part of a card.  Last year around Mother's Day I found this on a card....

  I hope that when people look at me 
they see a little bit of you.

From the moment I read this sentiment - I knew that was going to be the theme of my Mother's Day cards for this year. I am thinking this will be the Father's Day card theme too.
So.... to make this card I started from the inside out. 

I cut two pieces of corrogated cardboard 7"x8". I ripped a bit of the cardboard to show the ripples. 
I printed the sentiment off my computer. 
The frame around the sentiment is a Victorian Floral frame from Graphics Fairy.
Along with the sentiment I put pictures of my mom and I, and my daughter and my mom. 


The front piece of the card, I wrapped in lace that I adhered with hot glue and tacky glue. 
Then I proceeded to decorate the front with rhinestone border stickers and flowers. 

Of course I made one for my mother-in law....


and my Auntie too....


I punched holes in the card stock and attached the two halves together with binder rings. I printed another Victorian floral frame and pasted it on the back so I could sign the card and write "Happy Mother's Day"
Thanks for stopping by. Happy Mother's Day everyone!
Linking up to....
Graphics Fairy

UndertheTableandDreaming

Friday, May 6, 2011

Mother's Day Sign


Remember my "Spring" sign? I made that sign with the intention of switching it up for the seasons. This is what I did for Mother's Day. 

I painted "mother" on using washable white paint. I outlined it in chalk. I taped lace around the edge with double sided craft tape after I removed the corner scrolls, then I hot glued the scrolls back on using the glue sparingly so it will be easy to take off again.


The lace has flowers on it, so I added a sticker pearl to the center of each flower.


This turned out so pretty and feminine looking. I can't wait to show you the item that is to the right of this sign - but I can't show you until tomorrow!


Thanks for stopping by!

Linking up to....


Wednesday, May 4, 2011

Duct Tape and Staple Bag - Gift Bag Idea


I needed a fairly large gift bag for a Mother's Day gift - but I also wanted it to be a bag that could be used as a shopping bag or a beach bag. A couple years ago I made a no sew bag that was a lot of fun. I found it on the Martha Stewart website. A lady made bags with staples and duct tape. So cool!
Here is how I made mine:


I bought a vinyl tablecloth. I cut a piece of vinyl 24 inches wide and 44 inches long. I cut two strips for the handle that were 24 inches long - 3 inches wide. I folded the handle strips in to each other so no raw edges were showing and machine stitched around the edges. The handles were 1 1/4" wide when I was finished. If you want to make this a total no sew project - you can use ribbon, belts, cord, or other materials that already have a finished edge. 


1. Fold the vinyl in half. Fold each top edge over about 2 inches. Measure strap placement - I measured 7 inches from edge. Tape to secure. Then do a big strip of duct tape to finish the whole folded over edge.

2. Draw a line about 1" from both sides. Making sure the top edges are even - put a staple at the top of each side. Continue stapling very close together until you reach the bottom of the bag. Complete both sides.

3. Finish the stapled edges with duct tape - folding the tape over to cover the staples on both sides. You may need to cut the edge so the duct tape will fit - so measure or eyeball it before taping.


4. Once both sides of the bag are stapled and duct taped, put your hand in the bag to flatten out the bottom and make a triangle on the outside of the bag at both sides.

5. Picture 5 show the triangle that should be at the bottom of the bag. Draw a line across the triangle, about three inches in, depending on how wide you want the bottom of your bag to be. Staple across that line. Continue with other side.

6. Turn bag right side out. Picture 6 shows the bottom of the bag. You can duct tape over the staples or you can put a piece of cardboard in the bottom of the bag to make it more firm on the bottom.

I will be able to get another big bag from that table cloth and a smaller bag as well. The possibilities with these bags are endless. It is pretty cool to tell people that the bag is made using duct tape and staples too!

Thanks for stopping by!

Tuesday, May 3, 2011

Birthday Cake For a Dog and Cupcakes For You


Meet Pence. He is my daughter's dog. He was sold to her as a Beagle/Border Collie Cross. This is a picture of him when he was six months old. He definitely has some other breed in him as he is HUGE now. Most people guess it is Great Dane. What do you think?
Whatever breed he is - it is a good mix. He is such a good dog. My daughter has trained him to do all sorts of tricks - SIT, DOWN, ROLL OVER, BANG (he falls down like he is dead), SPIN, CRAWL, STAY and HIGH FIVE. This dog does not bark. To go outside he rings a bell. When he wants to get up, he yawns - trying to wake my daughter up politely. He is so cute. I just love this guy to pieces. 

He celebrated his first birthday last week. I suggested to my daughter that she make him a cake. This is what she did: 


Ingredients:  a can of dog food and some dog biscuits. My daughter reformed the dog food in an individual sized pot pie plate and plopped it on to another plate, then she put dog biscuits around the base. A simple special cake for the birthday boy - and boy did he love it!


Then I made cupcakes for the humans in the house, and topped them with doggie biscuits, or I should say, gingerbread cookies shaped into dog biscuits. Get the gingerbread cookie recipe I use by clicking

Check out my other dog related posts


Thanks for stopping by!
Linking up to....
Debbie Doos Pet Party